GyroPalm UI Designer
GyroPalm is proud to provide developers with a streamlined User Interface (UI) design process, similar to that of Visual Studio. GyroPalm now features a visual designer that enables anyone to create layouts for the Encore wearable. Developers no longer need to spend days and weeks with UI guesswork when they can create wearable experiences in a matter of minutes.
Overview
Technical Background
In the past, developers had to use TFT libraries and code all of their designs with textual commands and canvases. That means defining all the properties, making it difficult to align elements and risking design inconsistency. Some other wearable products at best provide users with fixed layouts, which sometimes inhibit one's creativity. However, GyroPalm understands the importance of customization, flexibility, and speed of deployment. GyroPalm adopts the open LVGL framework for graphics rendering to provide flexibility for the seasoned users. LVGL has been proudly used by many renown companies in the embedded industry.
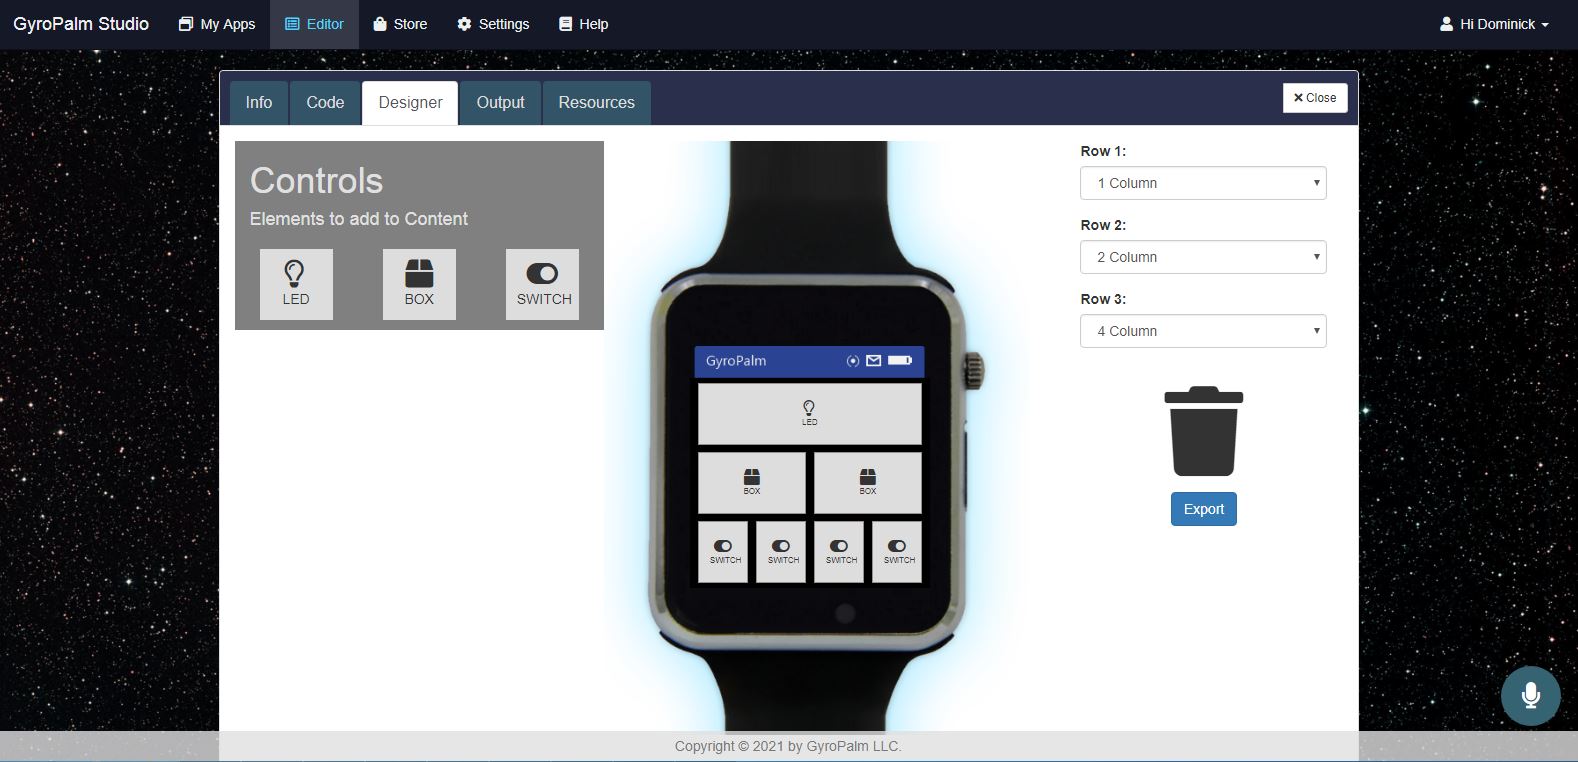
The GyroPalm visual designer is an online drag-and-drop tool (in GyroPalm Studio) that generates special code that is written for the GyroPalmLVGL library, an enhanced wrapper for LVGL. The developer does not need to install or include any additional dependencies. This is GyroPalm's extraordinary design assistant that helps you bring your use-cases to life faster than ever before.
To use simply add #include <GyroPalmLVGL.h> to your main code. You can choose to call LVGL functions yourself or use GyroPalm's visual designer.
Main Workflow
Export from visual designer -> GyroPalmLVGL syntax -> LVGL core
In this document, the following components will be addressed:
-
GyroPalm visual designer - The UI designer that is available in GyroPalm Studio. Upon design export, it creates code that is compatible with the GyroPalmLVGL library.
-
GyroPalmLVGL library - The C++ library that can easily be used in GyroPalm Studio. By including this library, you will have access to the LVGL core and exclusive GyroPalm methods to create UI easier.
-
LVGL core - The LVGL v7 core is included with GyroPalmLVGL. You can manually call LVGL widgets and functions, in addition to the ones mentioned in this document. To add widgets, see section External LVGL Elements.
Announcements
Key Advantages
Compared to conventional design approaches, users of GyroPalm visual designer will be able to appreciate:
- Fast deployment of wearable UI (from napkin drawing to working release)
- Easy to make changes from existing UI
- Visualize and manage UI for multiple apps and screens
- Automatic element centering and alignment
- Auto-generated event callbacks
- Several UI layout examples
- Native statusbar and system drawer
- Customizable App Launcher
Upcoming Release Notes
The following features will be incrementally released in future versions:
- User can specify text property (in labels, button, msg box)
- User can specify align property (top_left, top_mid, top_right, center_left, center_mid, center_right, bottom_left, bottom_mid, bottom_right)
The GyroPalmLVGL object
When do I need the GyroPalmLVGL object?
The GyroPalm object is the essential piece to rendering UI design on GyroPalm. By including one or more GyroPalmLVGL objects in your main code, you are able to run the code exported by the GyroPalm visual designer. You can also write LVGL and run similar syntax by manually typing in your main code. The GyroPalm object fundamentally simplifies the coding experience and makes projects more consistent and scalable.
It is highly suggested that you instantiate a GyroPalmLVGL object for every "screen" that you intend to have. You can do this by declaring GyroPalmLVGL several times as needed for each screen. In the examples used in this document, it is recommended that GyroPalmLVGL be instantiated via an object array (e.g. GyroPalmLVGL form[3] for a 3-screen project).
Using the GyroPalmLVGL object
To include and instantiate the GyroPalmLVGL object in your project, put the following lines at the top of your code:
#include <GyroPalmLVGL.h>

GyroPalmLVGL form[3];   //declare the ui objects
Now, you have access to the methods provided by GyroPalmLVGL. If you want to show the StatusBar (recommended), you will have to declare a global task such as lv_task_t* task1 and write a prototype for the update callback void lv_update_task(struct _lv_task_t *). Remember that if you are using the GyroPalmEngine object, you should include that first. An example of how to declare the above globals:
#include <GyroPalmEngine.h>
#include <GyroPalmLVGL.h>

GyroPalm *device;
GyroPalmEngine gplm("gp123456");    //declares a GyroPalm Engine object with wearableID

lv_task_t* task1;
void lv_update_task(struct _lv_task_t *);

//Screen indexes
enum Screen { SCR_HOME, SCR_SETTINGS }; //name your screens
//Screens
lv_obj_t *screen[2];    //screen pointers
GyroPalmLVGL form[2];   //screen helper methods
Screen curScreen = SCR_HOME;    //default screen
In the setup() function, you can enable the LVGL core and adjust the brightness as desired by running:
device->lvgl_begin();   //Enable LVGL core

device->bl->adjust(120);    //Lower the brightness
GyroPalmLVGL Elements
GyroPalmLVGL derives its elements from the LVGL core. These elements can be declared any number of times on any screen. GyroPalmLVGL elements provide a streamlined approach to building a versatile interface throughout the app life-cycle.
Available Elements
Objects displayed on the screen in LVGL are called Widgets (according to LVGL). Some may also refer to these "widgets" as screen items, controls (from Visual Studio), or elements (from Javascript). In this document, the terms widgets, controls, items, and elements may be used interchangeably to prevent repetition.
As GyroPalm continues its development in the visual designer, more elements will be available soon. Currently the following elements can be used:
- Status bar
- Label
- Button
- Image Button
- LED
- Slider
- Roller
- List
- Spinner
- Knob
- Checkbox
- Image
- MsgBox
- Page
- Window
- Launcher
- External LVGL Elements
- Dropdown Drawer
- QR Code
Showing a Button
Function Prototype
lv_obj_t * createButton(int x, int y, char *btnName, void (*userDefinedCallback)(lv_obj_t *, lv_event_t), bool isRect = false, int width = 100);
To show a button on the screen, this syntax may be used:
form[curScreen].createButton(0, 10, "Hello", event_handler);
In the above code, 0, 10 is the position offset from the center of the button's location, Hello is the name shown on the button, and event_handler is the name of the callback function to be run when the button encounters an event (e.g. button press/hold).
By default, buttons are rounded. If isRect is set to true, then the buttons will appear as rectangles. The default width is 100 pixels unless specified.
Callback Function
See the event callback function details for this element.
Showing an Image Button
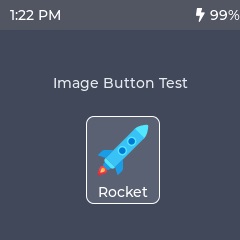
An image button is structurally similar to a regular button, except that it contains an image along with a label. Image buttons can provide an enriching wearable experience when used appropriately.
Function Prototype
lv_obj_t * createImgButton(int x, int y, const void* img_src, const char* btnName, void (*userDefinedCallback)(lv_obj_t *, lv_event_t));
To show an image button on the screen, the image must first be uploaded in the Resources tab. Drag and drop your PNG or JPG file and upload to the project's resources. In this example, we upload a PNG icon called rocket64 (an icon with 64px width). Your icon name in GyroPalmLVGL will be its filename, which should only be alphanumeric characters.

Then click the "conversion icon" next to your uploaded image. Uncheck "Generate UI Code for Icon" and click Convert. Once file is converted, click on the Code tab and enter the following below your includes:
LV_IMG_DECLARE(rocket64);
To show the image button on the screen, this syntax may be used:
form[curScreen].createImgButton(0, 0, &rocket64, "Rocket", btn_event_handler); //show the image button
Callback Function
See the event callback function details for this element.
Showing a Label
Function Prototype
lv_obj_t * createLabel(int x, int y, char *lblName, bool longText = false);
To show a label on the screen, this syntax may be used:
form[curScreen].createLabel(0, -60, "Hello World");
In the above code, 0, -60 is the position offset from the center of the label's location, Hello World is the text shown on the label. A label does not have a callback function. The longText boolean is only needed when the label is inside a Page. When inside a Page and set to true, this will wrap the text around the container element.
Updating a Label
To update the text of a label or set its value to a variable, a couple functions in core LVGL can be used such as lv_label_set_text or lv_label_set_text_fmt. But first, the label must be set in a global variable that can be accessed via the desired function. For example, an object can be declared as lv_obj_t *lblMain;
Here is an example of a label that reflects a counter which increments every second:
// Declare this in globals:
lv_obj_t *lblMain;
int counter = 0;

// Add these lines in lv_update_task like so:
void lv_update_task(struct _lv_task_t *data) {
    // Existing auto-generated code for updateBar and setTime...

    lv_label_set_text_fmt(lblMain, "Value: %d", counter);   //set label dynamically
    counter ++; //increment counter
}

void showApp(int page) {
    // Existing showApp code...

   switch (page)
    {
        case SCR_HOME:
        {
            //SCR_Home auto-generated code...

            lblMain = form[curScreen].createLabel(0, 0, "Hello World");    //show label
        }
        break;
    }
    //Remaining showApp code...
}
Showing an LED
Function Prototype
lv_obj_t * createLED(int x, int y, bool ledState, int brightness = -1);
To show an LED on the screen, this syntax may be used:
form[curScreen].createLED(-77, -37, true);
In the above code, 0, 10 is the x and y position offset from the center of the LED's location respectively. The LED will be fully lit, as ledState is true.
Changing the Color of an LED
Function Prototype
lv_obj_t * setLEDcolor(lv_obj_t * led, lv_color_t myColor);
To change the color of an LED on the screen, a new object of type lv_obj_t * will need to be created and set equal to the creation of a new LED object such as:
lv_obj_t * led1 = form[curScreen].createLED(-77, -37, true);
This allows us to then pass led1 into the setLEDcolor function.
lv_obj_t * led1 = form[curScreen].createLED(-77, -37, true);
form[curScreen].setLEDcolor(led1, LV_COLOR_RED);                //changes the LED color to RED
These are viable LED colors that can be entered into the second parameter of the setLEDcolor:
LV_COLOR_WHITE
LV_COLOR_SILVER
LV_COLOR_GRAY
LV_COLOR_BLACK
LV_COLOR_RED
LV_COLOR_MAROON
LV_COLOR_YELLOW
LV_COLOR_OLIVE
LV_COLOR_LIME
LV_COLOR_GREEN
LV_COLOR_CYAN
LV_COLOR_AQUA
LV_COLOR_TEAL
LV_COLOR_BLUE
LV_COLOR_NAVY
LV_COLOR_MAGENTA
LV_COLOR_PURPLE
LV_COLOR_ORANGE
Showing a Slider
Function Prototype
lv_obj_t * createSlider(int x, int y, int minVal, int maxVal, void (*userDefinedCallback)(lv_obj_t *, lv_event_t), int width = 150, int defaultVal = 0, bool isVert = false);
To show a slider on the screen, this syntax may be used:
form[curScreen].createSlider(0, 10, 0, 100, slider_event_handler);
In the above code, 0, 10 is the position offset from the center of the button's location, 0 is the slider's min value, 100 is the slider's max value, and slider_event_handler is the name of the callback function to be run when the slider encounters in interaction event (e.g. value changed).
The default width is 150 pixels unless specified. If defaultVal is set, then button of the slider knob will show up in the desired position, otherwise it will appear at 0. When isVert is true, then the slider will be a vertical one. In this case, the width value will be used as the height instead.
Callback Function
See the event callback function details for this element.
Showing a Roller
Function Prototype
lv_obj_t * createRoller(int x, int y, char *options, int itemsShown, void (*userDefinedCallback)(lv_obj_t *, lv_event_t), bool isInfinite = false, int width = 150);
To show a roller on the screen, this syntax may be used:
form[curScreen].createRoller(0, 10, "Item A\nItem B\nItemC\nItemD\nItemE", 3, roller_event_handler, false);
In the above code, 0, 10 is the position offset from the center of the roller's location, followed by a newline-separated char string that contains the options in the roller. At any given time 3 items will be visible and can be scrolled. The roller_event_handler is where the event callback is handled. When isInfinite is set to false, the roller stops when it's scrolled to the end. Changing this to true will loop the items back to the beginning after the user reaches the end.
Callback Function
See the event callback function details for this element.
Showing a List
Function Prototype
lv_obj_t * createList(int x, int y, int sizeX, int sizeY, lv_list_item * arrItems, int numItems, void (*userDefinedCallback)(lv_obj_t *, lv_event_t));
A list is similar to a menu. As objects exceed its container height, it will become scrollable. The objects can be pressed by the user, with the callback similar to that of a button. To show a list on the screen, this syntax may be used:
lv_list_item myItems[4];    //create array of 4 items

myItems[0].img_src = LV_SYMBOL_FILE;
myItems[0].txt = "Item A";
myItems[1].img_src = LV_SYMBOL_DIRECTORY;
myItems[1].txt = "Item B";
myItems[2].img_src = LV_SYMBOL_EDIT;
myItems[2].txt = "Item C";
myItems[3].img_src = LV_SYMBOL_SAVE;
myItems[3].txt = "Item D";

form[curScreen].createList(0, 60, 232, 100, myItems, 4, event_handler);
In the code above, 0, 60 is the position offset from the center of the list. The width and height, 232, 100 respectively, are declared. The array of list items, myItems has 4 allocated items. When a user presses an item on the list, it will be treated as if a button got pressed via the event_handler function.
Note that as more items are populated in myItems, the array count must be updated to reflect the total count. For example, if lv_list_item myItems[4]; has been declared, but the developer uses myItems[4].txt = "Item E";, a stack overflow error will occur and the project will crash.
Callback Function
See the event callback function details for this element.
Showing a Spinner
Function Prototype
lv_obj_t * createSpinner(int x, int y, int sizeX, int sizeY);
A spinner is like an animated arc, except that it is only for user experience purposes. To show a spinner on the screen, this syntax may be used:
lv_obj_t * spinner = form[curScreen].createSpinner(0, 10, 50, 50);
The code above will generate a spinner of size 50, 50 pixels that is shown on the center of the screen.
When the spinner is not needed, it can be deleted as follows:
lv_obj_del(spinner); //removes spinner
This element has no callback function.
Showing a Knob
Function Prototype
lv_obj_t * createKnob(int x, int y, int sizeX, int sizeY, int minVal, int maxVal, int defaultVal, void (*userDefinedCallback)(lv_obj_t *, lv_event_t));
A knob is actually an "adjustable arc" in LVGL. In GyroPalmLVGL, it will be referred to as a knob since it performs similarly to a potentiometer. To show a knob on the screen, this syntax may be used:
form[curScreen].createKnob(0, 0, 130, 130, 0, 100, 50, arc_event_handler);
The code above will generate a knob on the center of the screen at 0, 0 of size 130, 130 pixels. The arc can be adjusted by the user to range between 0 to 100 with the default position at 50. When the user adjusts the knob position, the arc_event_handler function gets called.
Callback Function
See the event callback function details for this element.
Showing a Checkbox
Function Prototype
lv_obj_t * createCheckbox(int x, int y, char *labelName, void (*userDefinedCallback)(lv_obj_t *, lv_event_t), bool isChecked = false);
A checkbox has similar properties to a button with toggle enabled. To show a checkbox on the screen, this syntax may be used:
lv_obj_t *myCheckbox = form[curScreen].createCheckbox(0, 0, "Auto Save", checkbox_event_handler, true);
The code above will generate a knob on the center of the screen at 0, 0 with the label "Auto Save". When a user changes the checked status of the checkbox, the checkbox_event_handler function will be called. By default, a checkbox is not checked. However, setting the last parameter to true will make the checkbox to be checked upon load.
Checking a checkbox
To change the checked status of a checkbox, the following syntax can be run as follows:
lv_checkbox_set_checked(myCheckbox, false); //unchecks a checkbox
// OR
lv_checkbox_set_checked(myCheckbox, true);  //checks a checkbox
Callback Function
See the event callback function details for this element.
Showing a Message Box
Function Prototype
lv_obj_t * createMsgBox(char * msgText, Prompt msgType, void (*userDefinedCallback)(lv_obj_t *obj, String btnText), bool autoClose = false);
A message box is a small modal that pops up in the middle of the current screen. It shows some text and one or more buttons to prompt the user for acknowledgment or decision-making. In order to use multiple messages boxes in a project, the message box object must be first declared in the global variables.
To show an acknowledgment message (with OK/Cancel), the following syntax may be used:
lv_obj_t * msgboxA; //Declare in globals

//To show the message box
msgboxA = form[curScreen].createMsgBox("This is a test message", PROMPT_OK_CANCEL, msgbox_handler);
To show a decision request message (with Yes/No or Yes/No/Cancel), the following syntax may be used:
lv_obj_t * msgboxB; //Declare in globals

//To show the message box
msgboxB = form[curScreen].createMsgBox("Do you want to save?", PROMPT_YES_NO_CANCEL, msgbox_handler);
To show an auto-close toast message (which disappears in 3 seconds), the following syntax may be used:
lv_obj_t * msgboxC; //Declare in globals

//To show the message box
msgboxC = form[curScreen].createMsgBox("This is a test message", PROMPT_OK, msgbox_handler, true);
Types of Prompts
There are different types of prompts you can use with the message box. The primary ones have been shown in the above example code. Here is a list of all the possible enums for Prompt msgType:
typedef enum {
    PROMPT_OK,
    PROMPT_OK_CANCEL,
    PROMPT_YES_NO,
    PROMPT_YES_NO_CANCEL,
    PROMPT_RETRY_CANCEL
} Prompt;
In the examples above, the msgbox_handler will catch all the responses from the user. From the message box object and response text, the firmware will be able to determine the next course of action. Message boxes disappear after any button has been pressed.
Callback Function
See the event callback function details for this element.
Creating a Window Object
Function Prototype
lv_obj_t* createWindow(char title,void(*userDefinedSettingsCallback)(lv_obj_t*,lv_event_t=NULL);
In the above function prototype, createWindow returns a Window object that we can store in a variable of type lv_obj_t. Its parameters consist of a char title and a callback function that is defined by the user.
Example of a Window Object
lv_obj_t* myWin = form[curScreen].createWindow("Text", settings_handler);
A new variable of type lv_obj_t is created that stores a Window object called myWin. This variable can be used to populate the Window with other objects (e.g. buttons, sliders, labels).
In the above code, Text is the name shown on the header of the Window and settings_handler is the name of the callback function that is run when the Window encounters an event (e.g. swiping, clicking and dragging).
Example of a Window Callback Function
static void settings_handler(lv_obj_t* obj, lv_event_t event)
{
    if(event== LV_EVENT_CLICKED)
    {
        Serial.println("Window Settings clicked!");
        //user defined code here
    }
    else if(event== LV_EVENT_RELEASED)
    {
        Serial.println("Window Settings released!");
        //user defined code here
    }
}
Populating a Window with a Button
//create the button on the Window object created above
lv_obj_t* btn = lv_btn_create(myWin, NULL);

//create a label that will be set on the button
lv_obj_t* label = lv_label_create(btn, NULL);

//set the text to the label
lv_label_set_text(label, "Button 1");

//set the button's alignment with int x and int y, default is centered
lv_obj_align(btn, myWin, LV_ALIGN_CENTER, x, y);

//set the button's width with int sizeX
lv_obj_set_width(btn, sizeX);

//set the button's height with int sizeY
lv_obj_set_height(btn, sizeY);
Creating a Page Object
Function Prototype
lv_obj_t* createPage(int x, int y, int sizeX, int sizeY, lv_scrollbar_mode_t scrollMode);
In the above function prototype, createPage returns a Page object that we can store in a variable of type lv_obj_t if needed. Its parameters consists of:
int x: sets the x axis
int y: sets the y axis
int sizeX: sets the width of the page
int sizeY: sets the height of the page
lv_scrollbar_mode_t scrollMode: changes the mode of the scrollbars
Modes for lv_scrollbar_mode_t
Changing the scrollMode allows us to change the way our page shows scrollbars.
LV_SCRLBAR_MODE_OFF Never show scroll bars
LV_SCRLBAR_MODE_ON Always show scroll bars
LV_SCRLBAR_MODE_DRAG Show scroll bars when the page is being dragged
LV_SCRLBAR_MODE_AUTO Show scroll bars when the scrollable container is large enough to be scrolled
LV_SCRLBAR_MODE_HIDE Hide the scroll bar temporally
LV_SCRLBAR_MODE_UNHIDE Unhide the previously hidden scrollbar. Recover the original mode too
Example of a Page Object
//Creates 2 buttons on a Page
lv_obj_t * pgButtons = form[curScreen].createPage(0, 20, 228, 170, LV_SCRLBAR_MODE_AUTO);
form[curScreen].createButton(-77, 0, "", btn_event_handler, true, 65);    //show element
form[curScreen].createButton(0, 0, "", btn_event_handler, true, 65);    //show element
form[curScreen].createButton(77, 0, "", btn_event_handler, true, 65);    //show element
form[curScreen].endPage();
createPage(...) and endPage() are both necessary to create a page. Any user defined objects such as buttons and sliders that want to be added onto a page must be defined within these two functions.
Horizontal or Vertical Scrolling only
By default, the Page container enables contents that exceed its width and height to be scrolled respectively. However, it is understood that this is not always desirable. This code may be added prior to endPage() to only enable scrolling in one axis:
lv_page_set_scrollable_fit2(pgButtons, LV_FIT_MAX, LV_FIT_NONE); //horizontal scroll only
// OR
lv_page_set_scrollable_fit2(pgButtons, LV_FIT_NONE, LV_FIT_MAX); //vertical scroll only
Bar Events
The "Bar" is the strip at the top of the screen. It may look similar to what you see on common smartphones and smart devices. The "Bar" shows the time, battery level, and other icons when applicable. It is very common for users to "swipe" the bar downwards to reveal a drawer-like panel. As a GyroPalm developer, you can customize what is shown to users in the drawer.
Register Bar Callback
Put the following line before the end of your void showApp(int page) function:
form[curScreen].setBarCallback(bar_handler);
As shown, bar_handler is the name of the callback function to be run when the status bar encounters an event (e.g. swiping and pressing). Once called, the status bar will be able to listen to events.
Function Prototype
void bar_handler(int barIntent)

//Where barIntent can match the following events:

typedef enum {
    BAR_PRESSING,
    BAR_SWIPE_LEFT,
    BAR_SWIPE_RIGHT,
    BAR_RELEASED,
    DRAWER_SHOW,
    DRAWER_HIDE
} BarIntent;
Bar Handler Function
In the following bar_handler example, swiping left on the status bar will take the user back to the SCR_HOME screen. Also, your project-specific code for showing the dropdown layout should be called in the DRAWER_SHOW event.
Example of a Bar Callback Function
void bar_handler(int barIntent)
{
    switch(barIntent)
    {
        //Prints Pressing
        case BAR_PRESSING:
            Serial.println("Pressing");
            break;

        //Prints Swipe Left and Returns User to HomePage
        case BAR_SWIPE_LEFT:
            Serial.println("Swipe Left");
            showApp(SCR_HOME);
            break;

        //Prints Swipe Right
        case BAR_SWIPE_RIGHT:
            Serial.println("Swipe right");
            break;

        //Prints Released
        case BAR_RELEASED:
            Serial.println("Released");
            break;

        //Calls when dropdown shown
        case DRAWER_SHOW:
            Serial.println("Dropdown Shown");
            showDrawer();
            break;

        //Calls when dropdown hidden
        case DRAWER_HIDE:
            Serial.println("Dropdown Hidden");
            break;
    }
}

void showDrawer()
{
    lv_obj_t * pgCont = lv_page_create(form[curScreen].drawer, NULL);   //creates a new page in drawer
    lv_obj_set_size(pgCont, LV_HOR_RES - 2, LV_VER_RES - 60);   //set size with very small margin
    lv_obj_align(pgCont, NULL, LV_ALIGN_CENTER, 0, -10); //Align to the center
    lv_obj_set_style_local_bg_opa(pgCont, LV_OBJ_PART_MAIN, LV_STATE_DEFAULT, LV_OPA_70);   //set slight opacity

    // LVGL Widget code goes here...
}
Design Practices for Dropdown Drawer
Developers have flexibility to design any layout into the Dropdown Drawer. However, the following design practices should be considered:
- Avoid designing duplicated interfaces into the Drawer that are already available in a screen
- Place buttons or labels in the drawer that are relevant to every single screen of the app/project
- Always consider using a scrollable "page" when adding content that may expand beyond screen bounds
- If storing the LVGL objects into globals, it is a good practice to dispose these objects once the user is done with them (on the
BAR_HIDEevent) - Common widgets that may be relevant for the dropdown may include Settings button, Sensitivity slider, Connection status labels, About button, etc.
When a bar callback is executed and barIntent is equal to BAR_SHOW, the wearable device indicates that the user has swiped downward to show the dropdown. At this moment, your code for showing the drawer should be run. In the example above, the showDrawer() function will run the LVGL code for the drawer interface.
Drawer Object
When creating the drawer interface, any widgets added to the following LVGL parent object will show up in the drawer:
form[curScreen].drawer
As per the recommendations, it is best to add an "LVGL page" to this object to make additional items scrollable.
At the time of writing, the GyroPalm LVGL Designer does not currently provide "drag and drop" functionality for adding elements to the drawer. The use of core LVGL elements is recommended.
Example Code for showDrawer Function
void showDrawer()
{
lv_obj_t * pgCont = lv_page_create(form[curScreen].drawer, NULL); //creates a new page in drawer
lv_obj_set_size(pgCont, LV_HOR_RES - 2, LV_VER_RES - 60); //set size with very small margin
lv_obj_align(pgCont, NULL, LV_ALIGN_CENTER, 0, -10); //Align to the center
lv_obj_set_style_local_bg_opa(pgCont, LV_OBJ_PART_MAIN, LV_STATE_DEFAULT, LV_OPA_70); //set slight opacity
// Add a button
lv_obj_t * btn1Label;
lv_obj_t * btn1 = lv_btn_create(pgCont, NULL); //add button to page
lv_obj_set_width(btn1, 80); //button width
lv_obj_set_style_local_radius(btn1, LV_BTN_PART_MAIN, LV_STATE_DEFAULT, 8);
lv_obj_align(btn1, NULL, LV_ALIGN_IN_TOP_MID, -52, 0); //alignment
btn1Label = lv_label_create(btn1, NULL);
lv_label_set_text(btn1Label, "Test"); //name of button
lv_obj_set_event_cb(btn1, btn_event_handler); //event handler
// Add another button
lv_obj_t * btn2Label;
lv_obj_t * btn2 = lv_btn_create(pgCont, NULL); //add button to page
lv_obj_set_width(btn2, 80); //button width
lv_obj_set_style_local_radius(btn2, LV_BTN_PART_MAIN, LV_STATE_DEFAULT, 8);
lv_obj_align(btn2, NULL, LV_ALIGN_IN_TOP_MID, 52, 0); //alignment
btn2Label = lv_label_create(btn2, NULL);
lv_label_set_text(btn2Label, "Settings"); //name of button
lv_obj_set_event_cb(btn2, btn_event_handler); //event handler
//Create a long label
lv_obj_t * label = lv_label_create(pgCont, NULL);
lv_label_set_long_mode(label, LV_LABEL_LONG_BREAK); //Automatically break long lines
lv_obj_set_width(label, lv_page_get_width_fit(pgCont)); //Set the label width to max value to not show hor. scroll bars
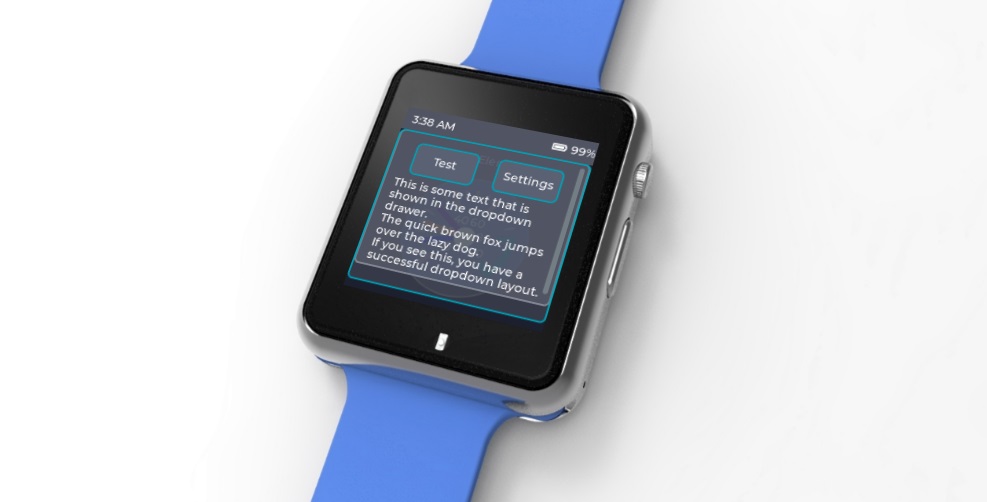
lv_label_set_text(label, "This is some text that is shown in the dropdown drawer.\n"
"The quick brown fox jumps over the lazy dog.\n"
"If you see this, you have a successful dropdown layout.");
lv_obj_align(label, NULL, LV_ALIGN_CENTER, 0, 28); //align underneath buttons
}
Practical Example Code for showDrawer Function
The following example code creates a button at the top-center of the drawer called "Hold to Activate". This on-screen button may be helpful for individuals who have difficulty performing an activation gesture. Of course, the button event callback will have to be written to handle the desired behavior. Two more labels are created to display the wearable ID and project ID, respectively.
void showDrawer()
{
    // Add manual Activation button
    lv_obj_t * btn1Label;
    lv_obj_t * btn1 = lv_btn_create(form[curScreen].drawer, NULL);  //add button to page
    lv_obj_set_width(btn1, 180); //button width
    lv_obj_set_style_local_radius(btn1, LV_BTN_PART_MAIN, LV_STATE_DEFAULT, 8);
    lv_obj_align(btn1, NULL, LV_ALIGN_IN_TOP_MID, 0, 15);  //alignment
    btn1Label = lv_label_create(btn1, NULL);
    lv_label_set_text(btn1Label, "Hold to Activate");   //name of button
    lv_obj_set_event_cb(btn1, btn_event_handler);   //event handler

    //Create a long label
    lv_obj_t * lblLine1 = lv_label_create(form[curScreen].drawer, NULL);
    lv_label_set_long_mode(lblLine1, LV_LABEL_LONG_BREAK);            //Automatically break long lines
    lv_obj_set_width(lblLine1, 200);          //Set the label width to max value to not show hor. scroll bars
    lv_label_set_text_fmt(lblLine1, "Wearable: %s", gplm.myLicense.wearableID);   //set label dynamically
    lv_obj_align(lblLine1, NULL, LV_ALIGN_CENTER, 15, 40);  //align underneath buttons

    //Create a long label
    String projectID = "{{appID}}";
    lv_obj_t * lblLine2 = lv_label_create(form[curScreen].drawer, NULL);
    lv_label_set_long_mode(lblLine2, LV_LABEL_LONG_BREAK);            //Automatically break long lines
    lv_obj_set_width(lblLine2, 200);          //Set the label width to max value to not show hor. scroll bars
    lv_label_set_text_fmt(lblLine2, "Firmware: %s", projectID.c_str());   //set label dynamically
    lv_obj_align(lblLine2, NULL, LV_ALIGN_CENTER, 15, 58);  //align underneath buttons
}
Here is an example of the btn_event_handler callback function:
static void btn_event_handler(lv_obj_t * obj, lv_event_t event)
{
    if (event == LV_EVENT_CLICKED) {
        String btnName = lv_list_get_btn_text(obj);
        Serial.printf("Clicked: %s\n", btnName);

        // Switch case code goes here...

    } else if (event == LV_EVENT_LONG_PRESSED) {
        String btnName = lv_list_get_btn_text(obj);
        Serial.printf("Long Pressed: %s\n", btnName);

        if (btnName == "Hold to Activate") {    // User held the Activation button
            form[curScreen].removeDropdown();   // Programatically hide the drawer
            lv_task_handler();                  // Update the screen
            gplm.vibratePress();                // Give haptic feedback
            gplm.setActive(true);               // Programatically activate the wearable
        }
    }
}
As shown above, the drawer can be programatically closed by calling form[curScreen].removeDropdown();. Doing this will delete the parent dropdown object with all the widgets inside from view.
Creating a Launcher
The Launcher is a special element that is available in GyroPalmLVGL only. This is an element that visually resembles a smartphone interface. Ideally, it can be implemented for an "app launcher", a grid layout for an MPC, or a virtual "stream deck" use-case.

This is a complex widget that combines the LVGL Tiles element and Image Buttons. The Launcher method positions an array of icons in a 2x2 (4 icons per page) or 3x2 (6 icons per page) grid. When an Image Button (app icon) is pressed, a predefined callback function is executed. The app image, text, and callback function is provided by the developer and populated into an object of type lv_app_icon.
The Launcher element takes an array of an object with the type lv_app_icon, which accepts an image (img_src), icon text (txt), and function pointer with void return. To populate the apps, developers can upload PNG icons via the Resources tab and convert them to a 64-pixel C file.
The signature for the type lv_app_icon is as follows:
typedef struct {
    const lv_img_dsc_t* img_src;
    const char* txt;
    void (*userDefinedAppStart)(void);
} lv_app_icon;
Function Prototypes
void createLauncher(lv_app_icon * appIcons, int numApps, int maxAppsPerPage = 6);

void clearLauncher(void);   //call this to remove launcher element and free up memory
To show a Launcher on the screen (with 4 icons), this syntax may be used:
// MUST declare these in the globals---------
LV_IMG_DECLARE(clock64);
LV_IMG_DECLARE(control64);
LV_IMG_DECLARE(ifttt64);
LV_IMG_DECLARE(perform64);

lv_app_icon appIcons[4];
// MUST declare these in the globals---------


// Declare this in the showApp function
int numApps = 0;

appIcons[numApps].img_src = &clock64;
appIcons[numApps].txt = "Clock";
appIcons[numApps].userDefinedAppStart = startApp;
numApps++;

appIcons[numApps].img_src = &control64;
appIcons[numApps].txt = "Control";
appIcons[numApps].userDefinedAppStart = startApp;
numApps++;

appIcons[numApps].img_src = &perform64;
appIcons[numApps].txt = "Perform";
appIcons[numApps].userDefinedAppStart = startApp;
numApps++;

appIcons[numApps].img_src = &ifttt64;
appIcons[numApps].txt = "IFTTT";
appIcons[numApps].userDefinedAppStart = startApp;
numApps++;

form[curScreen].createLauncher(appIcons, numApps, 4);
In order to use the above functions, the C-files to the icons above must be uploaded in the Resources tab. In the above code, createLauncher tells GyroPalmLVGL to create an LVGL tileview with 4 icons per tile. Optionally, you can change 4 to 6 to show a grid of 6 icons per tile. A tile in LVGL is a page that can be flipped by swiping across the screen.
As shown in the example above, numApps must be incremented every time a new appIcon is declared. If there is any mismatch between the array allocation and actual number of apps declared, a runtime error will occur. Ensure that lv_app_icon appIcons[4]; is updated to the correct number of apps every time the list is edited.
Replace startApp with the relevant function that should be executed when the user presses the icon. Remember that your function should have a signature of void appStartFunction(void);. This function can be located in .ino or .c files that are uploaded in the Resources tab.
If the Launcher is primarily being used as an "app launcher", ensure that the Launcher is cleared prior to opening your app. This prevents heap memory overload. Here is an example of a callback function to open an app:
void startApp()
{
    form[curScreen].clearLauncher(void);    //remove launcher from screen, free up memory

    openAppFunction();  //function to open your app
}
The clearLauncher function is not necessary if the Launcher is being used as a stream controller, MPC, or any other controller that is part of an app.
Using External LVGL Elements
The LVGL v7 core is included with GyroPalmLVGL. Developers who need access to LVGL widgets beyond what is already provided by GyroPalmLVGL can use reference the external widgets by simply calling the appropriate "widget creation function" while using form[curScreen]._screen as the parent object.
To find a list of all LVGL widgets that can be hypothetically rendered by GyroPalm, see the LVGL widgets and functions. As with all other interface elements, the code for the widgets must be declared in the showApp function on the appropriate page.
Example External LVGL Element
In this example, we will show a "gauge" widget which is available in LVGL but not yet available in GyroPalmLVGL. We will "inject" that element into the screen by replacing all instances of lv_scr_act() with form[curScreen]._screen. By running form[curScreen].showScreen(ANIM_NONE) afterwards, the custom LVGL element will be shown.
void showApp(int page) {
    if ((Screen) page != curScreen) {
        form[curScreen].removeBar();    //remove old StatusBar before proceeding
    }

    switch (page)
    {
        case SCR_HOME:
        {
            //Draw screen UI
            curScreen = (Screen) page;
            form[curScreen].init(screen[curScreen]);  //now defining screen items
            form[curScreen].createBar(barTask, lv_update_task);
            form[curScreen].setTime(gplm.getTime());
            form[curScreen].createLabel(0, -70, "Test Element");    //show element

            /*Describe the color for the needles*/
            static lv_color_t needle_colors[3];
            needle_colors[0] = LV_COLOR_BLUE;
            needle_colors[1] = LV_COLOR_ORANGE;
            needle_colors[2] = LV_COLOR_PURPLE;

            /*Create a gauge*/
            lv_obj_t * gauge1 = lv_gauge_create(form[curScreen]._screen, NULL);
            lv_gauge_set_needle_count(gauge1, 3, needle_colors);
            lv_obj_set_size(gauge1, 150, 150);
            lv_obj_align(gauge1, NULL, LV_ALIGN_CENTER, 0, 30);

            /*Set the values*/
            lv_gauge_set_value(gauge1, 0, 10);
            lv_gauge_set_value(gauge1, 1, 20);
            lv_gauge_set_value(gauge1, 2, 30);

            form[curScreen].showScreen(ANIM_NONE);   //show the screen w/ no animation
        }
        break;

        default: break;
    }
    form[curScreen].setBarCallback(bar_handler);
}
Creating a QR Code
The GyroPalmLVGL library supports QR codes, which are not included with LVGL v7 core by default. QR codes can be dynamically generated and shown on the current screen by including a special plugin and assigning an LVGL variable to hold this QR code for future reference. The QR code is considered an "external LVGL element" and can be displayed to the form[curScreen]._screen parent.

Function Prototypes
/**
 * Create an empty QR code (an `lv_canvas`) object.
 * @param parent point to an object where to create the QR code
 * @param size width and height of the QR code
 * @param dark_color dark color of the QR code
 * @param light_color light color of the QR code
 * @return pointer to the created QR code object
 */
lv_obj_t * lv_qrcode_create(lv_obj_t * parent, lv_coord_t size, lv_color_t dark_color, lv_color_t light_color);

/**
 * Set the data of a QR code object
 * @param qrcode pointer to aQ code object
 * @param data data to display
 * @param data_len length of data in bytes
 * @return LV_RES_OK: if no error; LV_RES_INV: on error
 */
lv_res_t lv_qrcode_update(lv_obj_t * qrcode, const void * data, uint32_t data_len);

/**
 * Delete a QR code object
 * @param qrcode pointer to a QR code object
 */
void lv_qrcode_delete(lv_obj_t * qrcode);
Implementation and Usage
To use the QR code generator, the special plugin must be included in your code. A global pointer should also be declared so the QR code can be references or disposed. Add this to your bare minimum GyroPalmLVGL code in GyroPalm Studio:
// GyroPalmEngine.h and GyroPalmLVGL.h includes...

#include <lv_qrcode.h>  // Include the LVGL QR code plugin

// Other AutoGenerated Globals...

lv_obj_t * qr;  // LVGL object for QR code

void createQR() {
    // Create a 150x150 QR code object
    qr = lv_qrcode_create(form[curScreen]._screen, 150, lv_color_hex3(0x018), lv_color_hex3(0xeef));
}

void updateQR(String qrString) {
    // Set data for QR code
    lv_qrcode_update(qr, qrString.c_str(), strlen(qrString.c_str()));
    lv_obj_align(qr, NULL, LV_ALIGN_CENTER, 0, 35); // Align to center of screen
}

// Other functions...
In your showApp(int page) function, call the createQR and updateQR functions consecutively at the specific case SCR_ of your choosing. For example:
void showApp(int page) {
    // ...typical switch declarations...

        case SCR_HOME:
        {
            //Draw screen UI
            curScreen = (Screen) page;
            form[curScreen].init(screen[curScreen]);  //now defining screen items
            form[curScreen].createBar(barTask, lv_update_task);
            form[curScreen].setTime(gplm.getTime());
            form[curScreen].createLabel(0, -60, "QR Code Test");    //show element

            createQR(); // Create a 150x150 QR code object

            updateQR("Hello World");    // Set QR code content

            form[curScreen].showScreen(ANIM_NONE);   //show the screen w/ no animation
        }
        break;

    // ... typical switch declarations...
}
Dynamically Update the QR Code
Keep in mind that every time you call the showApp function on the specific page of your QR code, it will be regenerated accordingly. To update the QR code dynamically without calling showApp, you may call the updateQR function with an updated String as needed. The old QR code will be overwritten and the widget will be refreshed.
If you would like the QR code to be updated every 10 seconds, you may do so by creating a new LVGL task and calling the updateQR function. Remember to use a non-blocking coding approach.
UI Callback Events
At the time of writing, the GyroPalmLVGL has 7 UI static callback events. One of these events, lv_update_task, is mandatory when using the StatusBar in the project. The events make it easy for you to manage the wearable experience without constantly polling certain functions in your loop.
A callback function or method is a function that you, the developer, normally define. To write the function, you would have to know the function prototype, write the function, tell GyroPalm to listen to events on its AI-core, and then register the relevant callback function(s).
Event Function Prototypes
Here is a function prototype that you can use to retrieve serial. Feel free to change the function name and the input variable name, but do not change the function return type or input type. There will be a completed example callback code provided at the end for your convenience.
static void event_handler(lv_obj_t * obj, lv_event_t event)
This function gets run with obj being the pointer to the object that triggered the event, along with the actual event itself. For example, a button clicked would have an LV_EVENT_CLICKED event.
You can check for a button click from a button called Hello and retrieve the button's name by writing this in the function callback:
static void event_handler(lv_obj_t * obj, lv_event_t event)
{
    if (event == LV_EVENT_CLICKED) {
        Serial.printf("Clicked: %s\n", lv_list_get_btn_text(obj));
        String btnName = lv_list_get_btn_text(obj);
        if (btnName == "Hello" && curScreen == SCR_HOME) {
            Serial.println("Hello button was clicked!");
        }
    }
}
void lv_update_task(struct _lv_task_t *data)
This function gets run with *data being null. This method is mainly run by a method in GyroPalmLVGL called form[curScreen].createBar(task1, lv_update_task). The code that goes inside this callback function will be run every 2 seconds. This is mainly intended for updating the StatusBar. The recommended code to go in this function is as follows:
    int battPercent = device->power->getBattPercentage();
    bool isCharging = device->power->isChargeing();
    form[curScreen].updateBar(battPercent, isCharging);
static void roller_event_handler(lv_obj_t * roller, lv_event_t event)
This function gets run with roller being the pointer to the object that triggered the event, along with the actual event itself. When the roller value is changed, the below function will print out the last item selected:
static void roller_event_handler(lv_obj_t * roller, lv_event_t event)
{
    if(event == LV_EVENT_VALUE_CHANGED) {
        switch (curScreen)
        {
            case SCR_HOME:
                char buf[32];
                lv_roller_get_selected_str(roller, buf, sizeof(buf));
                printf("Selected item: %s\n", buf);

                //If you want a String, you can always do:
                String str = String(buf);
            break;

            default: break;
        }
    }
}
static void slider_event_handler(lv_obj_t * slider, lv_event_t event)
This function gets run with slider being the pointer to the object that triggered the event, along with the actual event itself. When the position of the slider is changed, a label object called slider_label is updated to reflect the value of the slider.
The integer value of the slider is returned through the function lv_slider_get_value(slider).
static void slider_event_handler(lv_obj_t * slider, lv_event_t event)
{
    if(event == LV_EVENT_VALUE_CHANGED) {
        switch (curScreen)
        {
            case SCR_HOME:
                static char buf[4]; /* max 3 bytes for number plus 1 null terminating byte */
                snprintf(buf, 4, "%u", lv_slider_get_value(slider));
                lv_label_set_text(slider_label, buf);
            break;

            default: break;
        }
    }
}
static void arc_event_handler(lv_obj_t * knob, lv_event_t event)
This function gets run with knob being the pointer to the object that triggered the event, along with the actual event itself. As the user adjusts the "knob", the value of the arc changes. In this example, the value gets retrieved as an integer through lv_arc_get_value(knob) and gets printed out via the serial monitor:
static void arc_event_handler(lv_obj_t * knob, lv_event_t event)
{
    if(event == LV_EVENT_VALUE_CHANGED) {
        int sliderVal = lv_arc_get_value(knob);

        switch (curScreen)
        {
            case SCR_HOME:
                Serial.print("Knob: ");
                Serial.println(sliderVal);
            break;

            default: break;
        }
    }
}
static void msgbox_handler(lv_obj_t *obj, String btnText)
This function gets run with obj being the pointer to the object that triggered the event, along with the actual event itself. In this case, obj is the message box object with btnText being the name of the button which the user pressed. To effectively identify which message box encountered the response, the msgbox objects must be first declared as global variables.
//Globals
lv_obj_t * msgboxA;
lv_obj_t * msgboxB;

static void msgbox_handler(lv_obj_t *obj, String btnText)
{
    if (obj == msgboxA) {
        Serial.println("Response from MsgBox A");
        msgboxA = NULL;
    }
    else if (obj == msgboxB) {
        Serial.println("Response from MsgBox B");
        msgboxB = NULL;
    }
    Serial.print("User response: ");
    Serial.println(btnText);
}
static void checkbox_event_handler(lv_obj_t * checkbox, lv_event_t event)
This function get runs with checkbox being the pointer to the object that triggered the event, along with the actual event itself. We are looking for the LV_EVENT_VALUE_CHANGED event. In this case, we wish to get the name of the checkbox that got checked. To do that, we use lv_list_get_btn_text(checkbox) which returns the string name. To get the checked boolean, we use function lv_checkbox_is_checked(checkbox). A ternary statement is used in the below example for a one-line statement that prints out the details of which checkbox has been altered.
static void checkbox_event_handler(lv_obj_t * checkbox, lv_event_t event)
{
    if(event == LV_EVENT_VALUE_CHANGED) {
        String btnName = lv_list_get_btn_text(checkbox);
        switch (curScreen)
        {
            case SCR_HOME:
            {
                Serial.printf("Checkbox %s has been %s\n", btnName, lv_checkbox_is_checked(checkbox) ? "Checked" : "Unchecked");
            }
            break;

            default: break;
        }
    }
}
GyroPalmLVGL Best Practices
GyroPalmLVGL has cultivated some of the best practices inspired by other popular UI design techniques to enhance the design and development process while providing the great user experience and flexibility of LVGL.
While not every suggestion or concept is necessarily mandatory for proper operation of GyroPalmLVGL, developers are highly recommended to follow the practices conveyed below to ensure optimal compatibility and scalability in the future.
Defining Screen Globals
Screen indexes are enumerated as a Screen class, with the items as the name of the screens. Developers are encouraged to define enum Screen { SCR_HOME } in the global variables as a bare minimum. The screen items, will be used to identify screen properties in combination with GyroPalmLVGL and lv_obj_t arrays.
This practice suggests that pages are named with the prefix SCR_ such as SCR_HOME, SCR_SETTINGS, etc. The code editor in GyroPalm Studio provides Intellisense capability and by following this naming convention, developers will be able to see a list of available screens by typing SCR_ in the development process.
For example, this declaration would define 3 screens in the project:
// Create a Home, Control, and Settings screen
enum Screen { SCR_HOME, SCR_CONTROL, SCR_SETTINGS };

lv_obj_t *screen[3];    //screen pointers
GyroPalmLVGL form[3];   //screen helper methods
Screen curScreen = SCR_HOME;    //default screen
Defining Screen Elements
Elements can be defined on the screen inside the showApp function. Please refer to the above section about how to create buttons, labels, and other elements. Prior to drawing the UI, the curScreen global must be set to the current page.
Then, subsequently, the respective GyroPalmLVGL object can be referred to as form[curScreen]. The following example creates a label and a button on the screen:
curScreen = SCR_SETTINGS;   //set screen index
form[curScreen].init(screen[curScreen]);  //now defining Settings screen items
form[curScreen].createBar(task1, lv_update_task);   //show the StatusBar
form[curScreen].createLabel(0, -60, "GyroPalm Settings");  //create a new label
form[curScreen].createButton(0, 40, "Home", event_handler);  //create a new button
form[curScreen].showScreen(ANIM_RIGHT);   //show the screen w/ sliding right animation
Screen Transition
The form[curScreen].showScreen method will switch to the curScreen index defined above it. This method accepts one of many possible animations. If you prefer no animation when switching screens, you can run form[curScreen].showScreen(ANIM_NONE)
typedef enum {
    ANIM_NONE,
    ANIM_LEFT,
    ANIM_RIGHT,
    ANIM_FADE,
    ANIM_TOP,
    ANIM_BOTTOM
} Animation;
- ANIM_NONE - Switch screens with no animation
- ANIM_LEFT - Slide
form[curScreen]to the left - ANIM_RIGHT - Slide
form[curScreen]to the right - ANIM_FADE - Fade old screen into
form[curScreen] - ANIM_TOP - Slide
form[curScreen]to the top - ANIM_BOTTOM - Slide
form[curScreen]to the bottom
Setting and Getting a Screen
Setting a Screen
When you switch to a new screen, the old one is disposed from the memory. You can switch to another screen using the void showApp(int page) where page can be the name of your Screen enum index.
For example, to show the Home screen, you can run:
showApp(SCR_HOME);

// OR

Screen homePage = SCR_HOME;
showApp(homePage);
Getting a Screen
You can always retrieve the current screen enum index by referring to curScreen. Please note that curScreen must first be declared in your global variables and set inside the showApp the function.
void showApp(int page) Example
This function can be generated by GyroPalm's visual designer. However, it is also just as effective to write such function yourself:
void showApp(int page) {
    if ((Screen) page != curScreen) {
        form[curScreen].removeBar();    //remove old StatusBar before proceeding
    }

    switch (page)
    {
        case SCR_HOME:
            //Draw home UI
            curScreen = (Screen) page;
            form[curScreen].init(screen[curScreen]);  //now defining Home screen items
            form[curScreen].createBar(task1, lv_update_task);
            form[curScreen].createLabel(0, -60, "GyroPalm UI Example");  //create a new label
            form[curScreen].createButton(0, -10, "Settings", event_handler);  //create a new button
            form[curScreen].createButton(0, 40, "Delete Me", event_handler);  //create a new button
            form[curScreen].createButton(0, 90, "Hide Bar", event_handler);  //create a new button
            form[curScreen].showScreen(ANIM_LEFT);   //show the screen w/ sliding left animation
        break;

        case SCR_SETTINGS:
            //Draw settings UI
            curScreen = (Screen) page;
            form[curScreen].init(screen[curScreen]);  //now defining Settings screen items
            form[curScreen].createBar(task1, lv_update_task);
            form[curScreen].createLabel(0, -60, "GyroPalm Settings");  //create a new label
            form[curScreen].createButton(0, 40, "Home", event_handler);  //create a new button
            form[curScreen].showScreen(ANIM_RIGHT);   //show the screen w/ sliding right animation
        break;

        default: break;
    }
}
Object Visibility
Show Status Bar
The StatusBar can be created and shown with the following code:
form[curScreen].createBar(task1, lv_update_task);
Where task1 referrs to the null pointer you declared in the globals as lv_task_t* task1 and lv_update_task is the callback function that refreshes the battery info on the StatusBar.
Removing the Status Bar
Normally, we recommend showing the StatusBar to users. However, in rare cases where a full-screen application is needed, you do not have to call createBar.
In a case where createBar was called, you can remove the StatusBar by running:
form[curScreen].removeBar();
Delete an object
You can delete LVGL elements as long as you have the object pointer using this code:
lv_obj_del(obj);
Status Bar Objects
After the createBar(task1, lv_update_task) method is called, you have the ability to show or hide relevant StatusBar icons. These methods only work while the StatusBar is visible. These methods can be called from various event handler functions.
Showing Status Bar Icons
You can use the following code to show icons on the right-side area of the StatusBar as needed:
form[curScreen].showIcon(BAR_WIFI);
form[curScreen].showIcon(BAR_BLUETOOTH);
form[curScreen].showIcon(BAR_GLANCE);
Hiding Status Bar Icons
Similarly, you can use the following code to hide icons on the right-side area of the StatusBar as needed:
form[curScreen].hideIcon(BAR_WIFI);
form[curScreen].hideIcon(BAR_BLUETOOTH);
form[curScreen].hideIcon(BAR_GLANCE);
Showing the Steps View
There is an ability to show the user's step count value on the top-left of the StatusBar. You can display this with the following code, ideally placed inside the showApp function:
form[curScreen].setSteps(150200);
Of course, when showing the Steps View, it is imperative to show the actual number of steps for the user, not a fixed value. To retrieve number of steps the user has taken, please refer to the onStep callback function in the docs.
You will need to declare a uint32_t global variable to hold the step count, update this step count in the onStep callback function, and then provide this in form[curScreen].setSteps as needed. Here is an excerpt of a sample implementation:
// Define the GyroPalmEngine includes and object...

uint32_t steps = 0;     //declare this in the globals

//Event callback for updating step count
void onStep(uint32_t stepCount)
{
    steps = stepCount;  //set global var
}

//...your other functions...

void setup() {
    //...your other code...

    gplm.begin();
    delay(100);
    gplm.listenEvents(false);    //starts listening for events (set to true for verbose)

    gplm.setStepCallback(onStep);   //enable the onStep callback
}

//somewhere in your code...

form[curScreen].setSteps(steps);
// OR
form[curScreen].toggleTime(steps, gplm.getTime());  //toggle between steps and time
When you call the setSteps function, it will bring focus to show the number of steps and hide the Time View from the StatusBar automatically. If you run setSteps(0), it will resume the steps value from the last time you ran setSteps. Keep in mind that once you switch screens, you will have to run setSteps again.
Showing the Time View
There is an ability to show the current time on the top-left of the StatusBar. You can display this with the following code, ideally placed inside the showApp function:
form[curScreen].setTime("11:30 PM");
To show the current time, you can retrieve the time string using GyroPalm's realtime clock (RTC) and then run setTime as follows:
form[curScreen].setTime(gplm.getTime());
The date and time on the RTC can be configured in multiple ways via Serial, Bluetooth, and WiFi.
If you are in Steps View and want to switch to Time View without altering the existing time, you can run:
form[curScreen].setTime("");
Changing Step and Time Views
When setSteps and setTime are both not defined, the Steps View is shown by default with 0 steps. If you would prefer the Time View to be the default in StatusBar, run your createBar function as follows:
form[curScreen].createBar(task1, lv_update_task, true);
Furthermore, there are 2 other different ways you can elegantly change Step and Time Views for the user:
Every X seconds:
You can run a "toggle" function that alternates between Step and Time Views. Just make an LVGL task, for example, and assign it to run a callback function every 5 seconds which executes this code:
form[curScreen].toggleTime(steps, gplm.getTime()); //toggle between steps and time
On User Activity:
From the Firmware Section, we mentioned about UserActivity and how you can use activity callbacks to understand when the user is walking, running, or idle.
One possible implementation would be to show the Time View when the user is idle. And show Steps View whenever the user is walking or running. Here is an example of how to write such a callback:
void onActivity(int activity)
{
    if (activity == IDLE) {
        form[curScreen].setTime("");    //show time
    }
    else {  //user is likely moving
        form[curScreen].setSteps(0);    //show steps (resume last value)
    }
}
GyroPalmLVGL Example Code
To demonstrate the usage of the above callback function and proper GyroPalmLVGL implementation, here is some fully working example code that you can paste into GyroPalm Studio to evaluate:
#include <GyroPalmEngine.h>
#include <GyroPalmLVGL.h>

LV_FONT_DECLARE(digital_play_st_48);
LV_FONT_DECLARE(liquidCrystal_nor_64);

GyroPalm *device;
GyroPalmEngine gplm("gp123456");    //declares a GyroPalm Engine object with wearableID

AXP20X_Class *power;

lv_task_t* task1;
void lv_update_task(struct _lv_task_t *);

//Screen indexes
enum Screen { SCR_HOME, SCR_SETTINGS };
//Screens
lv_obj_t *screen[2];    //screen pointers
GyroPalmLVGL form[2];   //screen helper methods
Screen curScreen = SCR_HOME;    //default screen

uint32_t steps = 0;

static void event_handler(lv_obj_t * obj, lv_event_t event)
{
    if (event == LV_EVENT_CLICKED) {
        Serial.printf("Clicked: %s\n", lv_list_get_btn_text(obj));
        String btnName = lv_list_get_btn_text(obj);

        switch (curScreen)
        {
            case SCR_HOME:  //button from the home screen
                if (btnName == "Settings") {
                    showApp(SCR_SETTINGS);  //switch to settings screen
                }

                if (btnName == "Delete Me") {
                    // your action
                    lv_obj_del(obj);    //removes self when clicked
                }

                if (btnName == "Show Bar") {
                    form[curScreen].createBar(task1, lv_update_task);

                    lv_obj_t * label = lv_obj_get_child(obj, NULL); // get button text
                    lv_label_set_text(label, "Hide Bar"); // change button text
                }

                if (btnName == "Hide Bar") {
                    form[curScreen].removeBar();

                    lv_obj_t * label = lv_obj_get_child(obj, NULL); // get button text
                    lv_label_set_text(label, "Show Bar"); // change button text
                }
            break;
            case SCR_SETTINGS:  //button from the settings screen
                if (btnName == "Home") {
                    // your action
                    showApp(SCR_HOME);
                }
            break;

            default: break;
        }
    }
}

void onPwrQuickPress()
{
    /*
    After the AXP202 interrupt is triggered, the interrupt status must be cleared,
    * otherwise the next interrupt will not be triggered
    */
    power->clearIRQ();

    // We are sleeping the device when power button pressed
    device->displaySleep();
    device->powerOff();
    esp_sleep_enable_ext1_wakeup(GPIO_SEL_35, ESP_EXT1_WAKEUP_ALL_LOW);
    esp_deep_sleep_start();
}

void onStep(uint32_t stepCount)
{
    steps = stepCount;  //set global var
}

void lv_update_task(struct _lv_task_t *data) {
    int battPercent = power->getBattPercentage();
    bool isCharging = power->isChargeing();
    form[curScreen].updateBar(battPercent, isCharging);

    form[curScreen].toggleTime(steps, gplm.getTime());  //toggle between steps and time
    // OR just pick one:
    // form[curScreen].setTime(gplm.getTime());     //update Time View
    // form[curScreen].setSteps(steps);        //update Steps View
}

void showApp(int page) {
    if ((Screen) page != curScreen) {
        form[curScreen].removeBar();    //remove old StatusBar before proceeding
    }

    switch (page)
    {
        case SCR_HOME:
            //Draw home UI
            curScreen = (Screen) page;
            form[curScreen].init(screen[curScreen]);  //now defining Home screen items
            form[curScreen].createBar(task1, lv_update_task);
            form[curScreen].setTime(gplm.getTime());
            form[curScreen].createLabel(0, -60, "GyroPalm UI Example");  //create a new label
            form[curScreen].createButton(0, -10, "Settings", event_handler);  //create a new button
            form[curScreen].createButton(0, 40, "Delete Me", event_handler);  //create a new button
            form[curScreen].createButton(0, 90, "Hide Bar", event_handler);  //create a new button
            form[curScreen].showScreen(ANIM_LEFT);   //show the screen w/ sliding left animation
        break;

        case SCR_SETTINGS:
            //Draw settings UI
            curScreen = (Screen) page;
            form[curScreen].init(screen[curScreen]);  //now defining Settings screen items
            form[curScreen].createBar(task1, lv_update_task);
            form[curScreen].setTime(gplm.getTime());
            form[curScreen].showIcon(BAR_BLUETOOTH);
            form[curScreen].showIcon(BAR_GLANCE);
            form[curScreen].createLabel(0, -60, "GyroPalm Settings");  //create a new label
            form[curScreen].createButton(0, 40, "Home", event_handler);  //create a new button
            form[curScreen].showScreen(ANIM_RIGHT);   //show the screen w/ sliding right animation
        break;

        default: break;
    }
}

void setup() {
    gplm.begin();
    delay(100);
    gplm.listenEvents(false);    //starts listening for events (set to true for verbose)

    // Include only the callbacks you need:
    gplm.setStepCallback(onStep);
    gplm.setPwrQuickPressCallback(onPwrQuickPress);
    delay(200);

    device = gplm.wearable;                   //gives control to the developer to run device methods

    device->lvgl_begin();               //Initiate LVGL core
    device->bl->adjust(120);            //Lower the brightness

    power = gplm.power;              //gives control to the developer to access power methods
    power->setChargeControlCur(500);    //enable fast charging

    showApp(curScreen);
}

void loop() {
    lv_task_handler();
    delay(50);
}
Code Explanation
The code above generates an app layout with 3 buttons. The first button is called Settings. When clicked, the user is directed to the Settings page, where they are presented with another button called Home which brings the user back. The second button is called Delete Me. When clicked, it removes the button itself by deleting the object directly. The third button is called Hide Bar by default. When clicked, the StatusBar is removed and text changes to Show Bar. When clicked again, the StatusBar is redrawn again. Essentially, its the same button object, but with different text, you can make it run a different action.
GyroPalmLVGL Example v2
To demonstrate the usage of many elements/widgets available in the GyroPalmLVGL class, here is some fully working example code that you can paste into GyroPalm Studio to evaluate:
#include <GyroPalmEngine.h>
#include <GyroPalmLVGL.h>

GyroPalm *device;
GyroPalmEngine gplm("gp123456");    //declares a GyroPalm Engine object with wearableID

AXP20X_Class *power;
lv_task_t *barTask;
void lv_update_task(struct _lv_task_t *);

enum Screen { SCR_HOME, SCR_BUTTONS, SCR_LEDS, SCR_CONTROL, SCR_STATS, SCR_ROBOT }; //Screen indexes
lv_obj_t *screen[6];    //screen pointers
GyroPalmLVGL form[6];   //screen helper methods
Screen curScreen = SCR_HOME;    //default screen

lv_obj_t * msgboxA;
lv_obj_t * msgboxB;

void lv_update_task(struct _lv_task_t *data) {
    int battPercent = power->getBattPercentage();
    bool isCharging = power->isChargeing();
    form[curScreen].updateBar(battPercent, isCharging);
    form[curScreen].setTime(gplm.getTime());     //update Time View
}

void onPwrQuickPress()
{
    /*
    After the AXP202 interrupt is triggered, the interrupt status must be cleared,
    * otherwise the next interrupt will not be triggered
    */
    power->clearIRQ();

    // We are sleeping the device when power button pressed
    device->displaySleep();
    device->powerOff();
    esp_sleep_enable_ext1_wakeup(GPIO_SEL_35, ESP_EXT1_WAKEUP_ALL_LOW);
    esp_deep_sleep_start();
}

void onStep(uint32_t stepCount)
{
    steps = stepCount;  //set global var
}

static void btn_event_handler(lv_obj_t * obj, lv_event_t event)
{
    if (event == LV_EVENT_CLICKED) {
        String btnName = lv_list_get_btn_text(obj);
        Serial.printf("Clicked: %s\n", btnName);

        switch (curScreen)
        {
            case SCR_HOME:
                if (btnName == "Demo Buttons") {
                    showApp(SCR_BUTTONS);
                }
                else if (btnName == "Demo LEDs") {
                    showApp(SCR_LEDS);
                }
                else if (btnName == "Demo Control") {
                    showApp(SCR_CONTROL);
                }
                else if (btnName == "Demo Stats") {
                    showApp(SCR_STATS);
                }
                else if (btnName == "Demo Robot") {
                    showApp(SCR_ROBOT);
                }
            break;

            case SCR_BUTTONS:
                if (btnName == "Msg A") {
                    msgboxA = form[curScreen].createMsgBox("This is a test message!", PROMPT_OK_CANCEL, msgbox_handler, false);
                }
                else if (btnName == "Msg B") {
                    msgboxB = form[curScreen].createMsgBox("Do you want to save?", PROMPT_YES_NO_CANCEL, msgbox_handler, false);
                }
                else if (btnName == "Home") {
                    showApp(SCR_HOME);
                }
            break;

            case SCR_LEDS:
                if (btnName == "Home") {
                    showApp(SCR_HOME);
                }
            break;

            case SCR_CONTROL:
                if (btnName == "Home") {
                    showApp(SCR_HOME);
                }
            break;

            case SCR_STATS:
                if (btnName == "Home") {
                    showApp(SCR_HOME);
                }
            break;

            case SCR_ROBOT:
                if (btnName == "Home") {
                    showApp(SCR_HOME);
                }
            break;

            default: break;
        }
    }
}

static void slider_event_handler(lv_obj_t * slider, lv_event_t event)
{
    if(event == LV_EVENT_VALUE_CHANGED) {
        int sliderVal = lv_slider_get_value(slider);

        switch (curScreen)
        {
            case SCR_HOME:

            break;

            default: break;
        }
    }
}

static void roller_event_handler(lv_obj_t * roller, lv_event_t event)
{
    if(event == LV_EVENT_VALUE_CHANGED) {
        int rollerIndex = lv_roller_get_selected(roller);
        char buf[32];   //selected string
        lv_roller_get_selected_str(roller, buf, sizeof(buf));

        switch (curScreen)
        {
            case SCR_HOME:

            break;

            default: break;
        }
    }
}

static void msgbox_handler(lv_obj_t *msgbox, String btnText)
{

    if (msgbox == msgboxA) {
        Serial.println("Response from MsgBox A");
        msgboxA = NULL;
    }
    else if (msgbox == msgboxB) {
        Serial.println("Response from MsgBox B");
        msgboxB = NULL;
    }
    Serial.print("User response: ");
    Serial.println(btnText);
}

void showApp(int page) {
    if ((Screen) page != curScreen) {
        form[curScreen].removeBar();    //remove old StatusBar before proceeding
    }

    switch (page)
    {
        case SCR_HOME:
        {
            //Draw screen UI
            curScreen = (Screen) page;
            form[curScreen].init(screen[curScreen]);  //now defining screen items
            form[curScreen].createBar(barTask, lv_update_task);
            form[curScreen].setTime(gplm.getTime());

            lv_list_item myItems[5];
            myItems[0].img_src = LV_SYMBOL_FILE;
            myItems[0].txt = "Demo Buttons";
            myItems[1].img_src = LV_SYMBOL_DIRECTORY;
            myItems[1].txt = "Demo LEDs";
            myItems[2].img_src = LV_SYMBOL_EDIT;
            myItems[2].txt = "Demo Control";
            myItems[3].img_src = LV_SYMBOL_SAVE;
            myItems[3].txt = "Demo Stats";    //show element
            myItems[4].img_src = LV_SYMBOL_IMAGE;
            myItems[4].txt = "Demo Robot";    //show element

            form[curScreen].createList(0, 15, 224, 180, myItems, 5 , btn_event_handler);    //show element

            form[curScreen].showScreen(ANIM_LEFT);   //show the screen w/ no animation
        }
        break;

        case SCR_BUTTONS:
        {
            //Draw screen UI
            curScreen = (Screen) page;
            form[curScreen].init(screen[curScreen]);  //now defining screen items
            form[curScreen].createBar(barTask, lv_update_task);
            form[curScreen].setTime(gplm.getTime());

            form[curScreen].createButton(-58, -37, "Home", btn_event_handler, true, 98);    //show element

            form[curScreen].createButton(58, -37, "Msg A", btn_event_handler, true, 98);    //show element

            form[curScreen].createButton(-58, 67, "Msg B", btn_event_handler, true, 98);    //show element

            form[curScreen].createButton(58, 67, "Button", btn_event_handler, true, 98);    //show element

            form[curScreen].showScreen(ANIM_RIGHT);   //show the screen w/ no animation
        }
        break;

        case SCR_LEDS:
        {
            //Draw screen UI
            curScreen = (Screen) page;
            form[curScreen].init(screen[curScreen]);  //now defining screen items
            form[curScreen].createBar(barTask, lv_update_task);
            form[curScreen].setTime(gplm.getTime());

            form[curScreen].createLED(-77, -37, true);    //show element

            form[curScreen].createLED(0, -37, false);    //show element

            form[curScreen].createLED(77, -37, true);    //show element

            form[curScreen].createButton(-58, 67, "Home", btn_event_handler, true, 98);    //show element

            form[curScreen].createLabel(58, 67, "LEDs Active");    //show element

            form[curScreen].showScreen(ANIM_RIGHT);   //show the screen w/ no animation
        }
        break;

        case SCR_CONTROL:
        {
            //Draw screen UI
            curScreen = (Screen) page;
            form[curScreen].init(screen[curScreen]);  //now defining screen items
            form[curScreen].createBar(barTask, lv_update_task);
            form[curScreen].setTime(gplm.getTime());

            form[curScreen].createButton(-58, -37, "Home", btn_event_handler, true, 98);    //show element

            form[curScreen].createSlider(58, -37, 0, 100, slider_event_handler, 108, 50);    //show element

            form[curScreen].createRoller(0, 60, "Item A\nItem B\nItemC\nItemD\nItemE", 3, roller_event_handler, true, 224);    //show element

            form[curScreen].showScreen(ANIM_RIGHT);   //show the screen w/ no animation
        }
        break;

        case SCR_STATS:
        {
            //Draw screen UI
            curScreen = (Screen) page;
            form[curScreen].init(screen[curScreen]);  //now defining screen items
            form[curScreen].createBar(barTask, lv_update_task);
            form[curScreen].setTime(gplm.getTime());

            form[curScreen].createLabel(-77, -37, "Station 1\nEnabled");    //show element

            form[curScreen].createLabel(0, -37, "Station 2\nDisabled");    //show element

            form[curScreen].createLabel(77, -37, "Station 3\nEnabled");    //show element

            form[curScreen].createButton(-77, 67, "Home", btn_event_handler, true, 59);    //show element

            form[curScreen].createLabel(0, 67, "Voltage \n119.82 V");    //show element

            form[curScreen].createLabel(77, 67, "Current \n4.625 A");    //show element

            form[curScreen].showScreen(ANIM_RIGHT);   //show the screen w/ no animation
        }
        break;

        case SCR_ROBOT:
        {
            //Draw screen UI
            curScreen = (Screen) page;
            form[curScreen].init(screen[curScreen]);  //now defining screen items
            form[curScreen].createBar(barTask, lv_update_task);
            form[curScreen].setTime(gplm.getTime());

            form[curScreen].createButton(0, -54, "Forward", btn_event_handler, true, 68);    //show element

            form[curScreen].createButton(-77, 15, "Left", btn_event_handler, true, 59);    //show element

            form[curScreen].createButton(0, 15, "Home", btn_event_handler, true, 59);    //show element

            form[curScreen].createButton(77, 15, "Right", btn_event_handler, true, 59);    //show element

            form[curScreen].createButton(0, 84, "Backward", btn_event_handler, true, 68);    //show element

            form[curScreen].showScreen(ANIM_RIGHT);   //show the screen w/ no animation
        }
        break;

        default: break;
    }
}


void setup() {
    gplm.begin();
    delay(100);
    gplm.listenEvents(false);    //starts listening for events

    // Include only the callbacks you need:
    gplm.setStepCallback(onStep);
    gplm.setPwrQuickPressCallback(onPwrQuickPress);
    delay(200);

    device = gplm.wearable; //gives control to the developer to run device methods
    device->lvgl_begin();   //Initiate LVGL core
    device->bl->adjust(120);    //Lower the brightness
    power = gplm.power;     //gives control to the developer to access power methods
    power->setChargeControlCur(500);    //enable fast charging

    showApp(curScreen);
}

void loop() {
    lv_task_handler();
    delay(50);
}
Code Explanation
The code above generates an app layout with 5 unique screens. These screens contain layouts that you can create in the GyroPalm Visual Designer. This code will look very similar to the output exported by the Designer.
The Home screen will show a list view that contains buttons that will take you to the other screens: Buttons, LEDs, Control, Stats, and Robot.
Clicking on Demo Buttons will bring you to a screen showing 4 buttons, respectively Home, Msg A, Msg B, and Button. Clicking on Msg A will show you a message box with an OK/Cancel prompt. Clicking Msg B will show you a message box with a Yes/No/Cancel prompt. Clicking Home will take you back to the main screen.
Clicking on Demo LEDs will show a screen with a row of 3 adjacent LEDs. Each LED can be set at a different state or brightness level, with brightness taking priority. There is a static label on the bottom right. Clicking Home will take you back to the main screen.
Clicking on Demo Control will show a screen with a button, slider, and roller. The roller contains a few elements the can be scrolled infinitely. You can change the boolean in createRoller if you do not want infinite scrolling. The slider can be adjusted using your finger. Clicking Home will take you back to the main screen.
Clicking on Demo Stats will show a screen that contains various aligned labels. These labels can be used to show statistics and operational metrics of machines and devices. Clicking Home will take you back to the main screen.
Clicking on Demo Robot will show a screen that contains several "gamepad style" buttons. These buttons can be pressed or used as visual indicators to control a robot. These buttons can be made responsive by mapping them via the btn_event_handler callback. Clicking Home will take you back to the main screen.
GyroPalm Screenshot Utility
The GyroPalmLVGL object makes it relatively easy to take a screenshot of your app and download them on your computer. You can take screenshots using the GyroPalm Screenshot Utility. Screenshots are initially saved in binary format. However, GyroPalm provides a converter to render the image in PNG format. GyroPalm also provides another complimentary utility called the GyroPalm Render Tool which places your screenshot into stylish product mockups.
What is the Screenshot Utility?
The GyroPalm Screenshot Utility is an optional library that can be included whenever a developer needs to take screenshots on a GyroPalm Encore and wirelessly download them on a computer. Screenshots provide the end-user a better understanding of your app and the wearable experience. Using the Screenshot Utility enables higher quality screen captures than those taken from a typical camera.
Requirements
- Your code must instantiate the
GyroPalmEngine,GyroPalmLVGL, andGyroPalmRealtimeobjects - You are using
GyroPalmLVGLfor your app's user interface - Assuming
GyroPalmRealtimeinstantiated asrealtime, you must runrealtime.connectWiFi()prior tostartFileServer()
Installation
- Add this line at the end of your includes:
#include <snapshot.h> - Insert this function before the end of void setup():
startFileServer() - Insert this function in void loop():
listenSnapshot() - Open Serial monitor when wearable starts to see your IP address. Visit that URL on your computer.
Taking a Screenshot
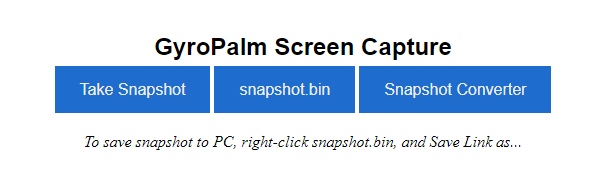
1. Type the IP address of your wearable into your computer's web browser.
2. On your wearable, navigate to the screen which you want to capture.
3. On your computer, click the Take Snapshot button. Wait 5-10 seconds until the wearable vibrates. (If the wearable restarts, try again)
4. Right-click on the snapshot.bin button. Click "Save Link as..." and save the file as needed.
5. Click Snapshot Converter button. You will be directed to GyroPalm's Snaphot Converter to render the image in PNG format.
6. Repeat process as needed until finished. Remove Installation from your main code once complete.
GyroPalm Render Tool
With an app screenshot, developers can showcase it by placing it in a mockup. The GyroPalm Render Tool is an extremely quick way to create amazing wearable experience mockups without using a camera. With this utility, you get to choose between using predefined modeled backdrops or your own uploaded images.

Follow these steps to create a stylish mockup:
- Open the GyroPalm Render Tool in your browser.
- Select a wearable model backdrop. The presets already have perspective corner data.
- Upload your wearable app screenshot by selecting Custom App. Select your PNG file.
- If you have uploaded a Custom Image, you will need to click Enable Editor, drag the four corners to the wearable's screen, and click Disable Editor. Skip this step for preset backdrops.
- Using the Snipping Tool in Windows, you may save the Result as a JPG file.
Screenshot Utility Tips
- The wearable needs to be configured to connect to WiFi. For details, see Connecting to the Internet.
- The wearable and computer need to be connected to the same WiFi network.
- Do not include
snapshot.hinto the production code of your app unless you need to take screenshots. Resources such as the file server in the snapshot utility may decrease battery life. Remove the code after usage. - Do not touch the wearable screen after clicking Take Snapshot until the device vibrates. Typically, screenshots can take 5-10 seconds to save.
- On your first attempt, if SPIFFS has never been formatted, the wearable may freeze and reset after 30 seconds. This is completely normal. Try to Take Snapshot again after the wearable powers up.
- Take screenshots and download them to your computer one at a time. The previous screenshot is overwritten in the memory every time you click Take Snapshot.
- The file server will not start unless the wearable is connected to WiFi.