GyroPalm Firmware
GyroPalm Studio encapsulates an extraordinary framework designed around the GyroPalm Encore wearable device. It provides both high and low level API access, premium functions, and gesture callback functions to developers.
Overview
This document will go over the basic procedures of writing code with GyroPalm Studio as well as GyroPalm-specific objects, functions, and data-types that go beyond the standard C++ subset.
The GyroPalm object
What is the GyroPalm object?
The GyroPalm object is a bare minimum object that defines the control methods and sensors inside a GyroPalm Encore device. When instantiated, this object provides access to get and set parameters that pertain to the Encore's sensors, emitters, display, wireless, power chip, and more. The GyroPalm object fundamentally simplifies the coding experience and makes projects more modular and scalable.
Using the GyroPalm object
To include and instantiate the GyroPalm object in your project, put the following lines at the top of your code:
#include <Encore.h>
GyroPalm *device;   //declares a null device
In your void setup() function, you must initiate the sensors in the GyroPalm object by putting this line:
device = GyroPalm::getWatch();
device->begin();
The GyroPalmEngine object
What is the GyroPalmEngine object?
The GyroPalmEngine object is an enhanced class object that extends the GyroPalm object. In other words, by using the GyroPalmEngine object, you do not have to include Encore.h into your main code. Instead, you would include GyroPalmEngine.h which contains both the GyroPalmEngine methods and the GyroPalm object.
Using the GyroPalmEngine object
To include and instantiate the GyroPalmEngine object in your project, put the following lines at the top of your code and replace gp123456 with your wearableID:
#include <GyroPalmEngine.h>

GyroPalm *device;   //declares a null device
GyroPalmEngine gplm("");    //declares a GyroPalm Engine object
In your void setup() function, you must initiate the sensors in the GyroPalmEngine object by putting this line:
gplm.begin(); //initate sensors and Serial
Suggestions and Warnings
Don't call Serial.begin - When using the GyroPalmEngine object, do not call Serial.begin() statement as that is already included for you in gplm.begin. Calling Serial.begin() may introduce runtime errors since it would be declared twice.
Don't include both Encore and GyroPalmEngine - When using the GyroPalmEngine object, do not declare #include <Encore.h> or it may result in errors or undesired operation. For best performance, do not instantiate more than one instance of GyroPalm and GyroPalmEngine object at any time in one project. Instantiating multiple objects may confuse the hardware and protocols.
Try to write non-blocking code - When using the GyroPalmEngine object, one of GyroPalm's cores will be dedicated as an AI-engine to process your gestures. When writing code, it is not necessary but highly recommended to use a non-blocking approach for best performance and screen refresh rate.
Retrieve GyroPalm object from GyroPalmEngine
The GyroPalmEngine object is very powerful and contains various methods and callbacks that would simplify your code. However, when using the GyroPalmEngine object, sometimes you may want to interact with the underlying GyroPalm object.
Here is an example code that takes the GyroPalmEngine object called gplm and retrieves the GyroPalm object to the null device pointer:
#include <GyroPalmEngine.h>

GyroPalm *device;   //declares a null device
GyroPalmEngine gplm("gp123456");    //declares a GyroPalm Engine object with wearableID

void setup() {
  Serial.println(gplm.getWearableID());     //print out the wearableID
  gplm.begin();                             //begins display, sensors, etc
  device = gplm.wearable;                   //gives control to the developer to run device methods
}

void loop() {
  device->tft->setCursor(30, 25);          //move cursor
  device->tft->print("Hello World");    //print text
  delay(2000);                         //wait couple seconds
}
Printing to Serial
Just like a debugging console, you can have the GyroPalm Encore print messages to a serial monitor on port 115200. Below are some examples:
Print serial using Encore.h
#include <Encore.h>
GyroPalm *device;   //declares a null device

void setup() {
  device = GyroPalm::getWatch();
  device->begin();
  Serial.begin(115200);
}

void loop() {
  Serial.println("Hello world");
  delay(1000);  //wait 1 second
}
Print serial using GyroPalmEngine.h
#include <GyroPalmEngine.h>

GyroPalm *device;   //declares a null device
GyroPalmEngine gplm("gp123456");    //declares a GyroPalm Engine object with wearableID

void setup() {
  gplm.begin();                             //begins display, sensors, etc
  device = gplm.wearable;                   //gives control to the developer to run device methods
}

void loop() {
  Serial.println("Hello world");
  delay(1000);  //wait 1 second
}
Unique Identifiers
Retrieving the Wearable ID
Each GyroPalm Encore device has a unique wearableID imprinted in its processor. This wearable is uniquely assigned from the factory. Although the wearableID can be used to identify the GyroPalm wearable via Bluetooth or the internet, it is not related to the MAC address in any way.
To retrieve the wearableID, the following variable returns a String:
gplm.myLicense.wearableID
Here is a brief example that prints out the wearableID:
#include <GyroPalmEngine.h>
#include <GyroPalmLVGL.h>

GyroPalm *device;   //declares a null device
GyroPalmEngine gplm("");    //declares a GyroPalm Engine object with wearableID

void setup() {
  gplm.begin();                             //begins display, sensors, etc
  delay(100);
  device = gplm.wearable;                   //gives control to the developer to run device methods
}

void loop() {
    Serial.println(gplm.myLicense.wearableID);  //print out the wearableID of this device
    delay(1000);
}
Retrieving the MAC Address
Each GyroPalm Encore device has a unique MAC address imprinted in its processor. This identifier is uniquely assigned from the factory. The MAC address can be useful for identifying the wearable or used alonside the wearableID to strengthen the entropy for device authentication purposes.
To retrieve the wearableID, the following method returns a String:
gplm.getMAC()
// returns MAC like: 00aa33bb5628
If you only want the last 4 characters of the MAC address, set the main parameter to true as follows:
gplm.getMAC(true)
// returns MAC like: 5628
Here is a brief example that prints out the MAC address:
#include <GyroPalmEngine.h>
#include <GyroPalmLVGL.h>

GyroPalm *device;   //declares a null device
GyroPalmEngine gplm("");    //declares a GyroPalm Engine object with wearableID

void setup() {
  gplm.begin();                             //begins display, sensors, etc
  delay(100);
  device = gplm.wearable;                   //gives control to the developer to run device methods
}

void loop() {
    Serial.println(gplm.getMAC());  //print out the wearableID of this device
    delay(1000);
}
Retrieving the current Project ID
All firmware written and compiled in GyroPalm Studio has its own projectID (or sometimes called appID). There may be occasions when the wearable may need to obtain the current GyroPalm projectID which it is using. For example, you may want to inform the GyroPalmRealtime server or another GyroPalm wearable about which app is currently running on your wearable.
The projectID may also be used to in GyroPalmSettings to store app-specific parameters for long term retrieval. The projectID is a unique identifier provided by the GyroPalmStudio compiler and it can be programatically retrieved in your code as follows:
String projectID = "{{appID}}"; //compiler will replace with the actual projectID

Serial.print("App ID: ");
Serial.println(projectID);  //now we can print it as follows
In other words, the placeholder "{{appID}}" will be replaced by the actual projectID upon compile. After declaring and setting the projectID global, if you need to use the GyroPalmSettings object, it can be instantiated as follows:
// If you wish to use GyroPalmSettings, put the following:

GyroPalmSettings settings;          //declares GyroPalm Settings object

void setup()
{
    //...existing code...
    settings.load(projectID);
}
To learn how to store settings in your GyroPalmStudio project, check out the GyroPalm Settings section.
Vibration
The GyroPalm wearable contains a vibration motor for haptic feedback. This motor is used for multiple purposes such as event-based notifications, gesture confirmation, alarms, etc. As part of the GyroPalmEngine object, developers have the ability to vibrate the device using the following methods:
gplm.vibrateTap();      //Similar to a tap
gplm.vibratePress();    //Similar to pressing a button
gplm.vibrateHold();     //Shake for a couple seconds
As a general guideline, whenever running the above methods more than once (or using a loop), always allow the end-user a means to dismiss or stop the vibration. Constantly vibrating the device may negatively affect the user experience and battery life.
Gesture Callbacks
With GyroPalm, you do not have to worry about writing gesture algorithms. You can develop impressive firmware for your application very quickly using our gesture callback functions.
What is a callback function?
If you have ever worked with an event-driven programming languages such as VB.NET, Visual C++, C#, Java, JavaScript, etc you would have written code inside functions that are called when a particular event is triggered.
For example, in JavaScript, if you were to write code inside a button's onClick() event, your code will run every time a user clicks your button. This is very much the same with GyroPalm Studio and how the GyroPalmEngine object was designed.
Implementing Callback Events
At the time of writing, the GyroPalmEngine has 9 gesture callback events. This tends to be a growing list as our team aims to provide rapidly improving gesture-based technology on a periodical basis.
A callback function or method is a funcion that you, the developer, normally define. To write the function, you would have to know the function prototype, write the function, tell GyroPalm to listen to events on its AI-core, and then register the relevant callback function(s).
Event Function Prototypes
Here is an example list of function prototypes that you can use. Feel free to change the function name and the input variable name, but do not change the function return type or input type. There will be a completed example callback code provided at the end for your convenience.
void onDeviceTilt(int direction)
This function gets run when the device orientation is changed (i.e. device gets tilted in a particular direction).
It is important to know that the frame of reference is different among device perspective, left-handed wearer perspective, and right-handed wearer perspective. To make the direction parameter easier to work with, we provide "enums" that correspond to a user-friendly frame of reference.
Enumeration Reference
enum DeviceDirection: int {
    TILT_UPRIGHT,
    TILT_FORWARD,
    TILT_BACKWARD,
    TILT_LEFT,
    TILT_RIGHT,
    TILT_UPSIDEDOWN
};

enum LeftHandDirection: int {
    LH_UPRIGHT,
    LH_FORWARD,
    LH_BACKWARD,
    LH_LEFT,
    LH_RIGHT,
    LH_UPSIDEDOWN
};

enum RightHandDirection: int {
    RH_UPRIGHT,
    RH_FORWARD,
    RH_BACKWARD,
    RH_LEFT,
    RH_RIGHT,
    RH_UPSIDEDOWN
};
void onActivity(int activity)
This function gets run when the user is walking, running, or idle. It does not run constantly, only when there is a change in pattern.
To make the activity parameter easier to work with, we provide "enums" that correspond to more user-friendly names.
Enumeration Reference
enum UserActivity: int {
    WALKING,
    RUNNING,
    IDLE
};
void onSnap(int snapTimes)
This function gets run when a user snaps once or two times consecutively within a 2.5 second time-frame. In order for this event to be triggered without false positives, the user must raise his/her wrist to naturally glance at the watch prior snapping their fingers. A double-snap must be done where both snaps are performed almost 1 second apart.
You can write a statement such as if (snapTimes == 1) to detect number of snaps. To make the snapTimes parameter easier to work with, we also provide "enums" that correspond to more user-friendly names.
Enumeration Reference
enum SnapType: int {
    SINGLE_SNAP,
    DOUBLE_SNAP
};
void onRawSnap()
This function is not the equivalent of onSnap. This function gets triggered globally, meaning any snap (or even clap) would be called here if the callback is enabled. This event should only be used for real-time gestures where onSnap is not suitable for its purposes due to the requirement of having the user tilt their wrist during realtime control (e.g. the need for left mouse-click) without staring at the watch.
You have been informed. GyroPalm will not be responsible for any false positives encountered when a developer chooses to use this event.
void onStep(uint32_t stepCount)
This function is run whenever the Encore device senses the user taking steps. Note that this function will not be triggered for every step, but rather periodically for a set of steps that are confidently taken.
The stepCount returns a 32-bit integer that can be shown to the user as desired. Note that setting stepCount to 0 will not reset the step count. To reset the step count, please read the section Reset Step Count.
void onGlance(bool isGlanced)
This function is used by other functions such as onSnap above. However, you may want to use this function to show an indicator to the user or to "dim the display" when isGlanced is false. This function can be used for power management purposes.
When a user naturally glances at the watch, onGlance will be called. The isGlanced parameter is a boolean which is true when the user raises his/her wrist to glance at the watch. Within 2~3 seconds of inactivity, this event will be called again where onGlance will become false.
void onShake(int numShakes)
This function is run whenever the Encore device senses more than one shake of the device in the Y axis. The callback runs once, only after the shaking has stopped. The numShakes parameter is an integer that reports the number of times the wearable has been shaken. Ideally, this gesture callback can be used to indicate the intent to "dismiss" action items (e.g. decline phone calls, window messages, etc).
In some other cases, this gesture can also be used as a Navigation Gesture (e.g. adjustment gesture) prior to Parameter Gesture. For example, after a user selects a lamp to control, a gesture such as onShake (with a minimum of 5 shakes) is triggered by the user to control the brightness variably. In other words, the adjustment gesture is a "transition intent" that tells the wearable to now accept "free-form" control.
For best practice, ensure that actions are only run after a minimum of 5 shakes or more. Additionally, always use an Activation Gesture prior to observing onShake when possible. Sometimes running or other vigorous activities may trigger onShake.
As mentioned, by default, the onShake callback only runs after the shaking motion has stopped. If you want to force the callback to return after a certain number of shakes have been reached, run setMaxShakes(int maxShakes) after you register the callback. For example:
gplm.setShakeCallback(onShake);
gplm.setMaxShakes(5);       //this will force callback  to return after 5 shakes reached
void onFlick(int direction)
This function has a signature similar to void onDeviceTilt(int direction) except that it detects flicks instead of change in tilted direction. The onFlick callback performs more complex computations behind the scenes. It detects a flick of the wrist (or swipe of the hand) in one of four directions: Left, Right, Up, and Down. This callback is best used as a Navigation Gesture (e.g. changing slides in a presentation or turning appliances on and off). Always use an Activation Gesture prior to observing onFlick when possible.
The callback is run immediately after a firm "flicking" motion is performed in one of the four orthogonal directions. If the user's flicks in a manner that is not confident to the direction (e.g. shaky or diagonally), the AI algorithm will choose the best motion interpretation (strongest confidence in direction) as the result.
The frame of reference is originally designed for left-handed wearers, but it can be inverted for right-handed wearer's perspective. The enum options for direction is as follows:
Enumeration Reference
enum FlickDirection: int {
    FLICK_LEFT,
    FLICK_RIGHT,
    FLICK_UP,
    FLICK_DOWN
};
void onGesture(String gestureName, String gestureID)
This function returns the custom gesture callback for motions that are dynamically trained and loaded into the wearable by the user. The onGesture callback is an advanced event that returns the gestureName and gestureID as strings of a particular trained gesture. It can be assumed that the gestureName is a user-assigned nickname for a particular gesture, while the gestureID is globally unique across all devices.
Users are able to see a list of all their gestures via the GyroPalm Dashboard. Gestures can be cloned and shared across many wearable devices, but it is important to remember that not all gestures are the same. Some gestures require certain nuances and qualities, so customizable gestures may not be a "one size fits all" solution.
For example, many GyroPalm users may have a gestureName of "Circle", but the actual data or gesture path may vary across the users. The gestureID serves as a fingerprint for the exact gesture that was trained at a certain point in time. As such, the gestureID will never be duplicated.
This callback is specific to Customizable Gestures. In order to make use of this callback, the wearable must first have gestures that are trained in its internal memory by the user (or existing gestures synced from the GyroPalm cloud). See the Customizable Gestures section for full details.
Note: Since 2023, GyroPalm wearables perform primary communication with the cloud using the GyroPalmRealtime server over a secure WiFi connection. This includes synchronization of gestures between the end-user's GyroPalm account and relevant wearable(s). Therefore, it is mandatory to first instantiate the GyroPalmRealtime and establish connection to the server prior to running the syncGestures() and trainGesture() methods. Calling said methods without a connection to the internet (and GyroPalmRealtime) would result in a failed response.
Helper methods that are used to add, remove, manage, and sync gestures are further described in the Customizable Gestures section.
//Put these in the setup to enable custom gestures
gplm.doCalibration(6);  //do 0.6 second calibration to get the offsets (device must be in the upright position)
gplm.loadGestures();    //load custom gestures set from internal memory

// Tells the wearable to start recording a new gesture and send it to the cloud
// If the training was successful, it will return "success"
// If there was a connection issue, it will return "errNoConnection"
// If the gesture storage is full, it will return "errMaxGestures"
String trainGesture(void);

// Run this function after the user performs an activation gesture
// Consider using haptic feedback and a 0.5 second delay prior to running (for best experience)
// After GyroPalm performs recognition, the onGesture callback will be run
void testGesture(void);     //tells the wearable to recognize a gesture performed

// By calling this function when GyroPalmRealtime is connected, the wearable will send a sync request to the cloud to obtain the latest gestures.
String syncGestures(void);      //fetch and update list of gestures (newly trained gestures on the wearable will be available in the user's cloud dashboard)

/*
    syncGestures() can return one of the following responses:
    "success" (successfully synchronized)
    "errServerProblem" (server intermittent issue)
    "errNoConnection" (no WiFi connection)
*/

// Deletes all the gestures from internal memory
// Understand that this action only deletes all the gestures locally on the device. Calling syncGestures() again will repopulate the gestures. To permanently delete all gestures, the end-user must do it using the GyroPalm Cloud Dashboard and then run sync again.
void formatGestures(void);
It is advised that the wearable provides a 0.5+ second delay after pressing a button or performing an activation gesture prior to running trainGesture() or testGesture().
Writing Callback Functions
You can write callback functions with if statements, nested if statements that involve global variables (if you have multiple navigation menus), or switch cases.
If you are looking for guidance on how to properly utilize/implement the gesture callbacks mentioned above, then please read the Gesture Documentation before continuing to the next section.
Listen to Events
Before registering your callback functions in the code, you must first request the GyroPalmEngine to start its AI-engine to listen to all applicable events in the first place.
To do that, write this line in your void setup() function after you .begin() the GyroPalmEngine object:
gplm.listenEvents(false);
There is a boolean parameter that is set to false which is the verbose. This boolean should always be kept to false in a production setting.
However, if you want to debug your code or explore any unused callback functions, you can set the verbose to true. This will tell GyroPalmEngine to give you helpful hints via the Serial monitor on baud 115200 for events you might not be addressing yet.
Registering Callback Functions
After calling gplm.listenEvents(false), you can now register your callback functions mentioned above. For best performance, only attach the callback functions you need for your application.
Here is an example list if you want to attach all the available callback functions:
gplm.setTiltCallback(onDeviceTilt);
gplm.setActivityCallback(onActivity);
gplm.setSnapCallback(onSnap);
gplm.setRawSnapCallback(onRawSnap);
gplm.setStepCallback(onStep);
gplm.setGlanceCallback(onGlance);
gplm.setShakeCallback(onShake);
gplm.setFlickCallback(onFlick);
gplm.setGestureCallback(onGesture);
gplm.setSyncDoneCallback(onSyncDone);
Callback Example Code
To demonstrate the usage of the above callback functions and parameters, here is some fully working example code that you can paste into GyroPalm Studio to evaluate:
#include <GyroPalmEngine.h>

GyroPalm *device;   //declares a null device
GyroPalmEngine gplm("gp123456");    //declares a GyroPalm Engine object with wearableID

//------------Callback functions-----------------------------------------
void onDeviceTilt(int direction)
{
    /*You should use Enums here, but here are raw values if you want:
      0 = forward, 1 = backward, 2 = right, 3 = left, 4 = upright, 5 = upsidedown

      For left-handed, use LH_FORWARD, etc.
      For right-handed, use RH_FORWARD, etc.
      For device orientation, use TILT_FORWARD, etc.
    */
    Serial.print("Tilted in the ");
    switch(direction)
    {
        case LH_UPRIGHT:
            Serial.println("Upright direction.");
        break;

        case LH_FORWARD:
            Serial.println("Forward direction.");
        break;

        case LH_BACKWARD:
            Serial.println("Backward direction.");
        break;

        case LH_LEFT:
            Serial.println("Left direction.");
        break;

        case LH_RIGHT:
            Serial.println("Right direction.");
        break;

        case LH_UPSIDEDOWN:
            Serial.println("Upsidedown direction.");
        break;
    }
}

void onActivity(int activity)
{
    switch(activity)
    {
        case WALKING:
            Serial.println("User is WALKING");
        break;

        case RUNNING:
            Serial.println("User is RUNNING");
        break;

        case IDLE:
            Serial.println("User is IDLE");
        break;
    }
}

void onSnap(int snapTimes)
{
    switch(snapTimes)
    {
        case SINGLE_SNAP:
            Serial.println("Performed Single Snap");
        break;

        case DOUBLE_SNAP:
            Serial.println("Performed Double Snap");
        break;
    }
}

void onRawSnap()
{
    Serial.println("Unfiltered Snap Event");
}

void onStep(uint32_t stepCount)
{
    Serial.print("Steps: ");
    Serial.println(stepCount);
}

void onGlance(bool isGlanced)
{
    if (isGlanced) {
        Serial.println("Watch is ready");
    }
    else {
        Serial.println("Watch is on standby");
    }
}

void onShake(int numShakes)
{
    Serial.print("Device has been shaken: ");
    Serial.print(numShakes);
    Serial.println(" times");
}

void onFlick(int direction)
{
    switch(direction)
    {
        case FLICK_LEFT:
            Serial.println("User flicked Left");
        break;

        case FLICK_RIGHT:
            Serial.println("User flicked Right");
        break;

        case FLICK_UP:
            Serial.println("User flicked Up");
        break;

        case FLICK_DOWN:
            Serial.println("User flicked Down");
        break;
    }
}
//------------Callback functions-----------------------------------------

void setup() {
    gplm.begin();
    delay(100);
    gplm.listenEvents(false);    //starts listening for gesture events (set to true for verbose)

    // Include only the callbacks you need:
    gplm.setTiltCallback(onDeviceTilt);
    //gplm.setActivityCallback(onActivity);
    gplm.setSnapCallback(onSnap);
    //gplm.setRawSnapCallback(onRawSnap);
    gplm.setStepCallback(onStep);
    //gplm.setGlanceCallback(onGlance);
    //gplm.setShakeCallback(onShake);
    //gplm.setMaxShakes(5);     //use this to force callback after 5 shakes reached
    //gplm.setFlickCallback(onFlick);

    delay(1000);
    device = gplm.wearable;      //gives control to the developer to run device methods
    Serial.println("I am alive!!!");

    device->tft->setTextColor(TFT_CYAN);
    device->tft->drawString("GyroPalm Callbacks", 5, 25, 4);
}

void loop() {
    Serial.print("Hello World. Loop runs on Core: ");
    Serial.println(xPortGetCoreID());
    delay(2000);
}
Power Management
Through the GyroPalm object, you have access to a "power" object and its functions. This means you have access to technical stats of the wearable such as voltage, current consumption, charge current, etc. You also have the ability to control how this power is consumed throughout the user experience. Through GyroPalmEngine, you are able to receive function callbacks for events such as USB connected, USB disconnected, power button pressed, etc. All this, and the ability to put the device to sleep to converve energy.
Power Functions
Using the GyroPalm object (assuming object name is device), you are able to call the following functions for power info and experimentation. You can run these in the main loop or inside a power callback function:
USB Connection Info
if (device->power->isVBUSPlug()) {
    // USB connected

    // Get USB voltage in millivolts (mV)
    float Vbus = device->power->getVbusVoltage();

    // Get USB current in milliamps (mA)
    float VbusCurrent = device->power->getVbusCurrent();

} else {
    // USB disconnected
}
Battery Status Info
if (power->isBatteryConnect()) {
    // Battery connected

    // Get Battery voltage in millivolts (mV)
    float Vbatt = device->power->getBattVoltage();

    if (power->isChargeing()) {
        // Get Battery charge current in milliamps (mA)
        float chargeCurrent = device->power->getBattChargeCurrent();
    } else {
        // Get Battery current consumption in milliamps (mA)
        float dischargeCurrent = device->power->getBattDischargeCurrent();

        //Get Battery charge percentage (%)
        int battPercent = device->power->getBattPercentage();
    }
} else {
    // Battery not connected
}
Power Callback Events
At the time of writing, the GyroPalmEngine has 3 power callback events. The events make it easy for you to manage the wearable experience without constantly polling certain functions in your loop.
A callback function or method is a funcion that you, the developer, normally define. To write the function, you would have to know the function prototype, write the function, tell GyroPalm to listen to events on its AI-core, and then register the relevant callback function(s).
Event Function Prototypes
Here is an example list of function prototypes that you can use. Feel free to change the function name and the input variable name, but do not change the function return type or input type. There will be a completed example callback code provided at the end for your convenience.
void onPwrConnect(bool isConnected)
This function gets run with isConnected being true when a USB cable is connected to the wearable. The function is also run with isConnected being false when the USB cable is disconnected from the wearable.
This event is helpful to call another function that updates the charging indicator on your display.
void onPwrQuickPress()
This function gets run when the user quickly presses the power button on the wearable.
This event is helpful to call another function that sleeps the wearable or returns to the home screen.
void onPwrLongPress()
This function gets run when the user presses and holds the power button on the wearable. Keep in mind that in any instance, a user holding the power button for more than 6 seconds will mechanically power off the device.
This event is helpful to call another function that sleeps the wearable or returns to the home screen.
Listen to Events
Just as mentioned in Gesture Callbacks, before registering your callback functions in the code, you must first request the GyroPalmEngine to start its AI-engine to listen to all applicable events in the first place.
To do that, write this line in your void setup() function after you .begin() the GyroPalmEngine object:
gplm.listenEvents(false);
You only need to declare the above line once. It is applicable for both GyroPalm Gesture callbacks and Power callbacks.
Registering Callback Functions
After calling gplm.listenEvents(false), you can now register your callback functions mentioned above. For best performance, only attach the callback functions you need for your application.
Here is an example list if you want to attach all the available callback functions:
gplm.setPwrConnectCallback(onPwrConnect);
gplm.setPwrQuickPressCallback(onPwrQuickPress);
gplm.setPwrLongPressCallback(onPwrLongPress);
Callback Example Code
To demonstrate the usage of the above callback functions and parameters, here is some fully working example code that you can paste into GyroPalm Studio to evaluate:
#include <GyroPalmEngine.h>

GyroPalm *device;   //declares a null device
GyroPalmEngine gplm("gp123456");    //declares a GyroPalm Engine object with wearableID
AXP20X_Class *power;    //declares a null power object

bool tftReady = false;

//------------Callback functions-----------------------------------------
void onPwrConnect(bool isConnected)
{
    if (tftReady) {
        if (isConnected) {
            device->tft->setTextColor(TFT_GREEN, TFT_BLACK);
            device->tft->drawString("   Connected   ", 5, 50, 4);
        }
        else {
            device->tft->setTextColor(TFT_RED, TFT_BLACK);
            device->tft->drawString("  Disconnected ", 5, 50, 4);
        }
    }
}
void onPwrQuickPress()
{
    if (tftReady) {
            device->tft->setTextColor(TFT_CYAN, TFT_BLACK);
            device->tft->drawString("   Quick Press ", 5, 75, 4);
    }
}
void onPwrLongPress()
{
    if (tftReady) {
            device->tft->setTextColor(TFT_CYAN, TFT_BLACK);
            device->tft->drawString("   Long Press ", 5, 75, 4);
    }
}
//------------Callback functions-----------------------------------------

void setup() {
    gplm.begin();
    delay(100);
    gplm.listenEvents(false);    //starts listening for events (set to true for verbose)

    // Include only the callbacks you need:
    gplm.setPwrConnectCallback(onPwrConnect);
    gplm.setPwrQuickPressCallback(onPwrQuickPress);
    gplm.setPwrLongPressCallback(onPwrLongPress);

    delay(1000);
    device = gplm.wearable;                   //gives control to the developer to run device methods
    power = gplm.power;              //gives control to the developer to access power methods
    Serial.println("I am alive!!!");

    device->tft->setTextColor(TFT_CYAN);
    device->tft->drawString("GyroPalm Power", 5, 25, 4);
    tftReady = true;

    power->setChargeControlCur(380);    //enable fast charging
}

void loop() {
    if (power->isVBUSPlug()) {
        // USB connected

        // Get USB voltage in millivolts (mV)
        float Vbus = power->getVbusVoltage();

        // Get USB current in milliamps (mA)
        float VbusCurrent = power->getVbusCurrent();

        Serial.print("Vbus: ");
        Serial.println(Vbus);
        Serial.print("VbusCurrent: ");
        Serial.println(VbusCurrent);
    }

    if (power->isBatteryConnect()) {
        // Battery connected

        // Get Battery voltage in millivolts (mV)
        float Vbatt = power->getBattVoltage();
        device->tft->setTextColor(TFT_CYAN, TFT_BLACK);
        device->tft->drawString("Vbatt: ", 5, 110, 4);
        device->tft->drawFloat(Vbatt, 2, 100, 110, 4);

        if power->isChargeing()) {
            // Get Battery charge current in milliamps (mA)
            float chargeCurrent = power->getBattChargeCurrent();
            device->tft->setTextColor(TFT_GREEN, TFT_BLACK);
            device->tft->drawString("Chg mA:    ", 5, 140, 4);
            device->tft->drawFloat(chargeCurrent, 2, 120, 140, 4);
        } else {
            // Get Battery current consumption in milliamps (mA)
            float dischargeCurrent = power->getBattDischargeCurrent();
            device->tft->setTextColor(TFT_RED, TFT_BLACK);
            device->tft->drawString("Drain mA: ", 5, 140, 4);
            device->tft->drawFloat(dischargeCurrent, 2, 120, 140, 4);

            //Get Battery charge percentage (%)
            float battPercent = power->getBattPercentage();
            device->tft->setTextColor(TFT_CYAN, TFT_BLACK);
            device->tft->drawString("Batt %: ", 5, 170, 4);
            device->tft->drawFloat(battPercent, 2, 100, 170, 4);
        }
    }
    delay(1000);
}
Optimize Power Consumption
By default, GyroPalm Encore is optimized for performance. In high performance that require continuous usage involving WiFi connection and published data every 30 seconds, the device has been tested to last up to 7 hours. Sustaining a WiFi connection and keeping the screen on consumes a significant amount of power. However, in many other routine cases with auto-sleep, the device can be optimized to last anywhere between 7 hours to 2 days of runtime with moderate to light usage respectively.
Long Lasting Sleep Mode
Similar to the behavior of a smartphone, apps can run in the background while the wearable sleeps (i.e. screen is off and processor is underclocked). Sleeping in this mode will sustain existing WiFi connections with GyroPalmRealtime and other BLE devices. To use this feature, you must use the GyroPalmEngine object. It is assumed you have instantiated it as gplm.
To enable long lasting sleep mode, follow these steps:
- Enable the
onPwrQuickPressby adding the following line to yourvoid setup()code:
void setup() {

    gplm.begin();
    delay(100);
    gplm.listenEvents(false);    //starts listening for events

    gplm.setPwrQuickPressCallback(onPwrQuickPress); //Enable onPwrQuickPress callback
    // other callbacks...
    delay(100);

    // remaining void setup() code...
}
2. Write the onPwrQuickPress and handlePowerWake functions above your void setup() function as follows:
void onPwrQuickPress()
{
    gplm.toggleSleep();
    if (gplm.isSleep) {
        // Turn off unused interrupts while sleep
        gplm.sensor->enableStepCountInterrupt(false);
        gplm.sensor->enableWakeupInterrupt(false);
        gplm.sensor->enableActivityInterrupt(false);
    } else {
        // Restore interrupts
        delay(5);
        gplm.sensor->enableStepCountInterrupt(true);
        gplm.sensor->enableWakeupInterrupt(true);
        gplm.sensor->enableActivityInterrupt(true);
    }
}

void handlePowerWake()
{
    power->readIRQ();
    if (gplm.isSleep && power->isPEKShortPressIRQ()) {
        Serial.println("GyroPalm wake");
        onPwrQuickPress();
    }
}
3. Call handlePowerWake() function inside your void loop() function. It's that easy!
Now, when you quickly press the power button on your Encore wearable, it will go into the long lasting sleep mode. The screen will go dark if the device was on, or vice-versa. This is similar to putting a smartphone on standby and waking it up. As mentioned above, certain interrupts from the IMU are disabled prior to calling gplm.toggleSleep() to prevent the wearable from prematurely waking up or staying asleep. The handlePowerWake() function must be called inside your void loop() function to properly wake up the wearable.
If you are using GyroPalmRealtime, you can wake the device by calling onPwrQuickPress() from any callback. Keep in mind that your void loop() code will still run even when the wearable is in this sleep mode. However, the performance will not be as high as compared to the device's wakeful state.
Sleep on Inactivity
You can enable long lasting sleep mode when the user is inactive. LVGL has a function that tracks the number of milliseconds since the last interaction. Follow these steps to implement:
- In your
lv_update_taskfunction, place the following code prior to the end:
void lv_update_task(struct _lv_task_t *data) {
   // existing code...

   // Auto-sleep on inactivity
    const int secondsBeforeSleep = 30;
    if (lv_disp_get_inactive_time(NULL) > secondsBeforeSleep*1000) {
        onPwrQuickPress();
        lv_disp_trig_activity(NULL);    //reset inactivity counter
    }
}
2. In addition to screen interactions, if you want to have any other gesture callback(s) keep the device awake, place this line in your gesture callback(s):
lv_disp_trig_activity(NULL); //trigger user activity
Wake on Glance
If you utilized the aforementioned long lasting sleep mode and would like to wake the GyroPalm Encore using the onGlance gesture callback, you can do that as follows:
- In your
void setup()function aftergplm.listenEvents, ensure you have declared thesetGlanceCallbacklike so:
    gplm.setPwrQuickPressCallback(onPwrQuickPress);
    gplm.setGlanceCallback(onGlance);
    delay(100);

    // other setup code...
2. Add the following onGlance callback function in your code:
void onGlance(bool isGlanced)
{
    if (gplm.isActive == false) {   //only takes effect if wearable not active
        if (isGlanced) {
            form[curScreen].showIcon(BAR_GLANCE);
            if (gplm.isSleep) { //wake on glance
                onPwrQuickPress();
                lv_disp_trig_activity(NULL);    //reset inactivity counter
            }
        } else {
            form[curScreen].hideIcon(BAR_GLANCE);
        }
    }
}
Explanation: Essentially, when the user glances at the GyroPalm Encore, the onGlance callback is executed with the isGlanced boolean as true. Remember that gplm.isActive is typically false when the user has not performed an activation gesture. In other words, we only handle onGlance when the Encore is on standby. It would not be desired to toggle the sleep while the wearable is actively being used. See GyroPalm Activation Gestures for details.
When the GyroPalm Encore is sleeping, gplm.isSleep is true. By running onPwrQuickPress() when the wearable is asleep, this will inherently wake it up since we are calling the same function that the power button calls. Subsequently, the lv_disp_trig_activity function tells LVGL that the user now has activity to keep the device on.
Low Power Watch Configs
If your application does not require WiFi and primarily uses the Encore as a watch or offline interface, consider adding these power-saving strategies in your void setup() as desired:
//Power reduction efforts
device->bl->adjust(120);    //dim the brightness
setCpuFrequencyMhz(120);    //reduce processor speed
WiFi.mode(WIFI_OFF);        //turn off WiFi
To really maximize the battery life, it is also recommended turn off the wearable by holding the power button for 6+ seconds when putting in storage.
Enable Fast Charging
By default, the GyroPalm Encore use a PMIC chip for power management that allows 300 mA for charging current. The charging current can be set up to 1000 mA to speed up charging. We recommend keeping the charging current at 380 mA for best battery life and to prevent the battery from getting warm.
Here is an example code that gets the current charging mA, changes it to 380 mA, and retrieves the charging mA again:
    int cur = power->getChargeControlCur();    //get the charge current (mA)
    Serial.print("Default charge current: ");   //print out charge current
    Serial.println(cur);
    delay(1000);
    power->setChargeControlCur(380);    //set charge current to 380 mA
    cur = power->getChargeControlCur();    //get the charge current again
    Serial.print("New charge current: ");       //print new charge current
    Serial.println(cur);
The above code can be run in the void setup() function.
Serial Event
When you need to communicate with the GyroPalm Encore wearable via a serial monitor, it can be tricky to retrieve commands. When using the GyroPalmEngine object, you can attach a serial callback function to provide you strings that are sent via the serial monitor.
At the time of writing, the GyroPalmEngine has 1 serial callback event. The event makes it easier for you to manage the wearable experience without constantly polling certain functions in your loop.
A callback function or method is a function that you, the developer, normally define. To write the function, you would have to know the function prototype, write the function, tell GyroPalm to listen to events on its AI-core, and then register the relevant callback function(s).
Event Function Prototypes
Here is a function prototype that you can use to retrieve serial. Feel free to change the function name and the input variable name, but do not change the function return type or input type. There will be a completed example callback code provided at the end for your convenience.
void onSerial(String msg)
This function gets run with msg being a string containing the information sent over the serial monitor.
Listen to Events
Just as mentioned in Power Callbacks and Gesture Callbacks, before registering your callback functions in the code, you must first request the GyroPalmEngine to start its AI-engine to listen to all applicable events in the first place.
To do that, write this line in your void setup() function after you .begin() the GyroPalmEngine object:
gplm.listenEvents(false);
You only need to declare the above line once. It is applicable for both GyroPalm Gesture callbacks, Power callbacks, and Serial callback.
Registering Callback Functions
After calling gplm.listenEvents(false), you can now register your callback function mentioned above. For best performance, only attach the callback functions you need for your application.
Here is an example list if you want to attach all the available callback functions:
gplm.setSerialCallback(onSerial);
Callback Example Code
To demonstrate the usage of the above callback functions and parameters, here is some fully working example code that you can paste into GyroPalm Studio to evaluate:
#include <GyroPalmEngine.h>

GyroPalm *device;   //declares a null device
GyroPalmEngine gplm("gp123456");    //declares a GyroPalm Engine object with wearableID

//------------Callback functions-----------------------------------------
void onSerial(String msg)
{
    Serial.print("Incoming: ");
    Serial.println(msg);
}
//------------Callback functions-----------------------------------------

void setup() {
    gplm.begin();
    delay(100);
    gplm.listenEvents(false);    //starts listening for events (set to true for verbose)

    // Include only the callbacks you need:
    gplm.setSerialCallback(onSerial);

    delay(1000);
    device = gplm.wearable;                   //gives control to the developer to run device methods
    Serial.println("I am alive!!!");

    device->tft->setTextColor(TFT_CYAN);
    device->tft->drawString("GyroPalm Serial", 5, 25, 4);
}

void loop() {
    delay(1000);
}
Pedometer Methods
The GyroPalm Encore features a built-in pedometer that can keep track of your steps. This pedometer is always enabled on the wearable and its data can be accessed any time by calling methods on the GyroPalmEngine object.
For convenience, GyroPalm provides advanced functions to calculate fitness data for personal use. GyroPalm products are not evaluated by the FDA and are not designed or intended to diagnose, treat, cure, or prevent any disease.
Retrieve Step Count
There are two main ways to retrieve the step count: by calling a getter method or by enabling the onStep callback.
Get Step Count using Method
Steps are kept as an unsigned 32-bit integer on the device. Typically, this value is reset whenever the device is power cycled. However, it can be restored by flash memory. The step count can be retrieved as follows:
uint32_t mySteps = gplm.getStepCount(); // Retrieve step count
Serial.println(mySteps);
Step Count using Callback
By attaching the onStep callback, your callback function will be executed every time the built-in pedometer detects the user taking new steps. The step count is provided as part of the callback. Read more about the onStep callback.
Advanced Fitness Functions
The Advanced Fitness Functions use the height and weight information obtained from the user. While having this information preferred, users are not necessarily required to provide such information to use the product for gesture-based functions. Therefore, complete data accuracy cannot be guaranteed.
Set Fitness Info
In order to use the Advanced Fitness Functions below, the following method must first be declared to specify the user's weight and height. If this method is not run, a default user profile will be assumed for all subsequent calculations (150 lbs, 65 inches). To set the fitness info, run the following:
//void setFitnessInfo(int lbsWeight, int inchesHeight);
// For example:
gplm.setFitnessInfo(150, 65);
Get Calories Burned
GyroPalm includes a built-in algorithm for calculating the calories burned. This algorithm takes into account several factors such as steps walked, user-provided weight and height, and average stride length for given user. To retrieve the number of calories (kCal) burned, run the following method:
uint32_t burnedCalories = gplm.getCaloriesBurned();
Serial.println(burnedCalories);
Get Distance Walked
GyroPalm includes a built-in algorithm for calculating the miles walked. This algorithm takes into account several factors such as steps walked, user-provided weight and height, and average stride length for given user. To retrieve the number of miles walked, run the following method:
float milesWalked = gplm.getMilesWalked();
Serial.println(milesWalked);
Get Body-Mass Index (BMI)
GyroPalm includes a built-in algorithm for calculating BMI. This algorithm takes into account factors such as user-provided weight and height. To retrieve the BMI, run the following method:
float myBMI = gplm.getBMI();
Serial.println(myBMI);
Reset Step Count
Steps on the local device can be reset by running the resetStepCount method. However, note that resetting the steps will also clear any methods that rely on step count (such as getMilesWalked). This may not affect any user data that has already been sychronized with GyroPalm's cloud. Only the end-user has access to fully remove fitness data. To reset step count, run the following:
gplm.resetStepCount(); // Reset steps to 0
Get Accelerometer Data
The GyroPalm Encore wearable features a Bosch 12-bit digital triaxial acceleration sensor. This sensor provides data to the AI-edge based algorithms for many of the gesture callbacks mentioned above. However, there are times where certain applications may require the raw accelerometer data (i.e. for a custom joystick use-case). The acceleration sensor can be accessed in a subclass of the GyroPalmEngine object.
Assuming you instantiated GyroPalmEngine as gplm, the following example code can be placed in a function to retrieve the raw accelerometer data:
Accel acc;
bool res = gplm.sensor->getAccel(acc);
if (res) {
    int xConst = constrain(acc.x, -360, 360);
    int yConst = constrain(acc.y, -360, 360);

    Serial.print("X: ");
    Serial.print(xConst);
    Serial.print("\t Y: ");
    Serial.println(yConst);
}
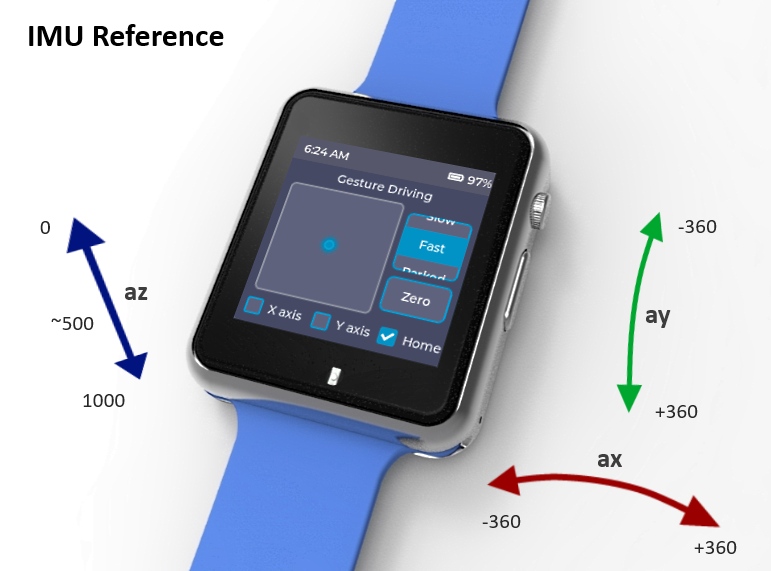
IMU Reference
Using GyroPalmEngine, you are able to retrieve the realtime x, y, and z values of the accelerometer through ax, ay, and az, respectively. The data is processed and slightly dampened to reduce jitter. The following diagram conveys the directions and axes orientations:
Enhanced IMU Methods (New)
As of September 2023, GyroPalm now provides more intuitive methods to obtain a calibrated reading from the accelerometer. The following syntax may be used:
// ...your includes, defines, and globals...
// GyroPalmEngine is required here

long lastTick = 0;

void setup() {
    // ...your setup code...
    Serial.println("Performing self-calibration...");
    gplm.doCalibration(10); // take 10 samples self calibration (device must be level)
}

void loop() {
    // ...your loop code...
    if (millis() - lastTick > 100) {    // obtain readings every 100 ms
        gplm.imuApplyOffsets(); // apply calibrated values

        Serial.print("x: "); Serial.print(gplm.ax); Serial.print("\t");
        Serial.print("y: "); Serial.print(gplm.ay); Serial.print("\t");
        Serial.print("z: "); Serial.print(gplm.az); Serial.println();

        lastTick = millis();    // mark the last timestamp
    }
}
As shown above, you may now use the integer values from gplm.ax, gplm.ax, and gplm.az. You may choose to run gplm.doCalibration at a later point if you desire to correct residual error.
Keep in mind that requesting sensor data at a frequent interval (e.g. above 15 FPS) or without controlled-delay may affect some other processes and/or battery life. A good practice is to only request streaming data after an activation gesture is performed or using an on-demand basis.
Clock Methods
The GyroPalm Encore wearable has a built-in realtime clock (RTC) that continues time-keeping functionality even when the watch is in low-power mode, deep sleep, or even completely powered off. In the lifetime of the product, the timekeeping of this clock cannot be paused or stopped.
This section will go over the various methods to set (sync) the time of the clock as well as retrieve the current date and time. This clock does not take into account timezones, so the current time provided should be either set in the user's local timezone or in UTC and manually converted to the user's local timezone. The first method is preferred unless a multi-timezone use-case is needed.
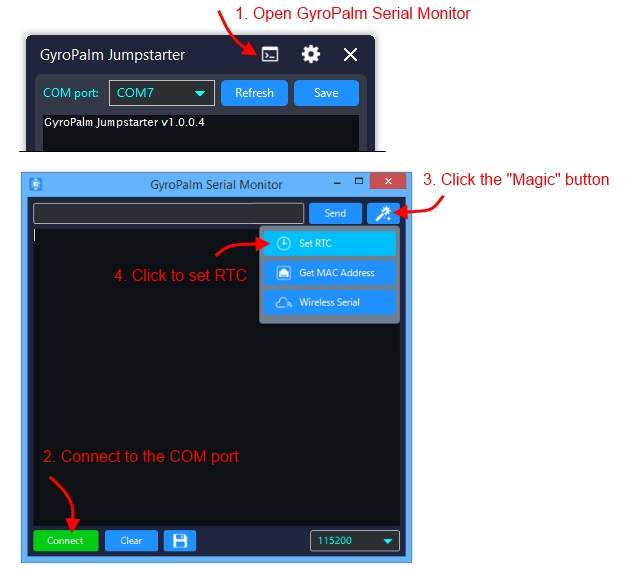
Syncing the clock automatically via Serial
Since February 2021, GyroPalmEngine has released built-in capability to sync the clock via serial. To set the clock with this method, open GyroPalm Jumpstarter, ensure your COM port is correct, and click the Serial Monitor icon. Next, click the Connect button. Once the Serial connection is established, click the Magic button and click Set RTC. Wait 2-3 seconds for the local time to be synced. You should see the local time displayed on your wearable. Please click Disconnect afterwards prior to removing the USB cable.
Syncing the clock manually using BLE
The clock can be synced via Bluetooth Low Energy (BLE) when GyroPalm's BLE stack is used. GyroPalm exposes a custom service with a characteristic that allows a comma-separated string containing the date and time to be sent to the wearable. End-users can take advantage of this feature using the GyroPalm smartphone app.
This function will be available to developers in a future release.
Syncing the clock via WiFi
Using GyroPalm's IP geolocation service via the GyroPalm Central API, users who provide their WiFi info to connect the GyroPalm Encore to the internet will have the advantage of a clock that is automatically set according to their detected timezone.
This function will be available to developers in a future release.
Getting the time
Assuming GyroPalmEngine object is instantiated as gplm, the time can be retrieved as a String by using the following method:
String curTime = gplm.getTime();    //retrieves time from RTC

Serial.println(curTime);
Getting the date and time
Assuming GyroPalmEngine object is instantiated as gplm, the date and time can be retrieved as a String by using the following method:
String curDateTime = gplm.getDateTime();    //retrieves date and time from RTC

Serial.println(curDateTime);
Getting advanced date and time
If you wish to design a complex watchface or app that requires the components of date and time, the above methods may not suffice for your needs. In this case, a method can be called to retrieve an RTC object that contains the year, month, day, hour, minute, and second. All the variables will be provided in 16-bit integers and the hour is in 24 hr format.
RTC_Date timeNow = gplm.getTime24();
Serial.print(timeNow.year);
Serial.print("-");
Serial.print(timeNow.month);
Serial.print("-");
Serial.print(timeNow.day);
Serial.print(" ");
Serial.print(timeNow.hour);
Serial.print(":");
Serial.print(timeNow.minute);
Serial.print(":");
Serial.print(timeNow.second);
Serial.println();
Virtual Multimeter
Analysis on power consumption can be performed using GyroPalm's built-in "Virtual Multimeter" methods which can acquire and log power data of the device during the occurrence of various events (e.g. boot up, sleep, WiFi usage, etc). This can be helpful for helping developers analyze and optimize power usage throughout the GyroPalm experience. These functions can provide data equivalent to connecting a physical multimeter to the battery of the wearable.
Capture current power status
The current system's power status (i.e. bus voltage, bus current, battery voltage, battery percentage, discharge current, etc) can be captured instantaneously and stored as a data point in the SPIFFS (in a file called powerLog.txt) by strategically placing this line of code in any callback event:
gplm.powerLog("Event Name");
Function Prototype
The function has this prototype for developers to maximize the usage:
String GyroPalmEngine::powerLog(String logReason)
This function accepts a string called logReason, which could be a nickname of the event you wish to monitor or filter. For example, if you want to monitor the power level every time the user glances at their wrist, you can implement the solution by putting gplm.powerLog("user glanced") in the onGlance gesture callback. Since the SPIFFS has a write limit of 100,000 cycles, it is not recommended to call this method continuously in a loop function without ensuring a reasonable run interval has been put in place (e.g. delay, LVGL task, millis() check, etc).
Data Format
Every time this function is run, a new row is appended to the SPIFFS with the power data in the following comma-separated order:
timestamp, reason, Vbus, mA_bus, Vbatt, battPercent, isCharging, chargeCurrent (mA), dischargeCurrent (mA)
The string which this function returns would be the power data in the order as mentioned above.
Sync the power log
To obtain a copy of the GyroPalm power log that was generated by the method above, a developer may run the following method to easily and quickly sync all the data to the GyroPalm cloud:
gplm.syncPowerLog();
Function Prototype
The function has this prototype, where the string returned is the HTTP status:
String GyroPalmEngine::syncPowerLog()
Again, it is not recommended to call this method continuously in a loop function. Exceeding reasonable limitations (e.g. syncing more than once per 5 seconds) may cause the GyroPalm cloud to suspend your wearable's sync privileges. This function should be triggered manually by the user only when diagnostic data is needed.
Clear the power log
Power data is normally appended in the wearable's file-system. As it accumulates over time, the storage will fill up. To clear the power log history, a developer may run the following method to quickly delete the power log:
gplm.clearPowerLog();
Function Prototype
The function has this prototype, where the Boolean returned is the status:
bool GyroPalmEngine::clearPowerLog()
When this method is run, the data stored in the power log on the wearable is permanently deleted and cannot be restored. However, previous power logs which are already synced to the GyroPalm cloud and downloaded on the user's computer should still remain accessible.
GyroPalm Internal Memory
The GyroPalm Encore contains a set of files in the SPIFFS memory that vary according to usage. Critical files including license.txt and settings.txt must be present for proper operation. Should these critical files be deleted or manually altered, it will immediately render the device inoperable and require GyroPalm Support.
SPIFFS Filesystem
Files are arranged in the following manner inside SPIFFS. Developers have full capabilities to create and delete new files of their own, as long as it does not conflict with the filenames indicated below"
/
├─ formatComplete.txt
├─ gestures.txt
├─ license.txt
├─ powerLog.txt
├─ settings.txt
├─ steps.txt
sounds/
├─ button.mp3
├─ choose.mp3
├─ conformation.mp3
├─ notification.mp3
File Usage
formatComplete.txt - Used to indicate successful SPIFFS format.
gestures.txt - Raw binary storage of customizable gestures.
license.txt - Contains the unique wearableID and serial of the current device. Tampering with this file is against GyroPalm's Terms of Use, will void your warranty, and may render the device inoperable.
powerLog.txt - Contains rows of power usage information for the Virtual Multimeter functionality.
settings.txt - Contains run-time information such as screen brightness, screen timeout, timezone, power cycles, fitness info, etc.
steps.txt - Contains activity information such as steps walked, idle/walking/running activity, calories burned, etc.
The /sounds folder may contain some default system sounds. Developers are more than welcome to download more MP3 sound files on the device. Recommended sound length is 5 seconds or less to reduce memory usage.
GyroPalm App Framework
In GyroPalm Studio, there are 2 ways to handle the app lifecycle, namely the Project-Contained App Framework and Platform-Contained App Framework. At the time of writing, developers are mainly encouraged to use the Project-Contained App Framework as it provides easier implementation of one or more apps. Furthermore, app templates are readily available on our organization's GitHub. Apps can also be version controlled since they are written in a single-file format. The Platform-Contained framework is a work in progress that will soon be released to more developers.
Project-Contained App Framework
In the Project-Contained App Framework, apps are written in the form of .ino files and uploaded in the "Resources" tab of a project. Global variables in the main code are shared amongst all apps. The main code gets compiled alonside all the .ino files in the project directory.
Coding Template
Here is a boilerplate example of how you would start a new .ino app:
// App globals here

void [app name]_show()
{
    // Code to run once when your app starts
}

void [app name]_hide()
{
    // Code to close your app
}

void [app name]_loop()
{
    // Code that runs in a loop
}
Calling your app in Main Code
To ensure that your app functions can be called in the main code when needed, an SCT (system code template) will be provided in the near-future to help you properly execute the apps. After you upload your .ino app, you will also have to map the functions above to the relevant function callbacks and populate the app array.
The SCT would provide a "launcher" experience similar to more smartphone environments. The user will have the ability to launch your app via an icon on the home screen.
Closing your app
When the user swipes to the left on the status bar, a callback is run which can take the user back to the home screen. However, certain objects or variables in your app may still be running or occupying memory. You can free those up by calling [app name]_hide() where the code in that function either clears out unused objects or sets the pointers to null.
App Scopes
At any point of time, your .ino app will have access to the global variables in the Main Code. Likewise, your main code will have access to the functions and declaration in your .ino code.
However, an .ino app will not have access to the functions and variables in another .ino app unless it was declared in Main Code. This prevents app data from being misused in another "app". The GyroPalm Studio platform follows the conventional norms of C++ scopes.
Customizable Gestures
GyroPalm's patented system enables wearables to detect complex non-linear gestures that can be trained without repetition. This capability is intended for users and developers who would like more advanced customization of their wearable. GyroPalm not only enables users to create customizable gestures, but also assign these gestures across various apps and platforms to run important routines. Think of this like "speed dial" for multipurpose automation.
Concept
GyroPalm's customizable gesture system can be accessed through certain methods in the GyroPalmEngine object. Unlike the standalone gesture callbacks such as onTilt, onGlance, etc, there is only one gesture callback for the customizable gesture system. This callback can be used to distinguish 10-15 customizable gestures per wearable. Both used and unused gestures can be interchanged and managed via the GyroPalm Cloud Dashboard. The custom gesture callback will be triggered after the method gplm.testGesture() is executed and the user performs a customizable gesture. If a wearable calls gplm.testGesture() but the user does not perform any gesture, the default Idle gesture will be returned in the callback.
The callback is typically named onGesture and will provide two String parameters named gestureName and gestureID, respectively. Developers can expect both parameters to contain text up to 15 characters. Customizable gestures can be trained by the wearer or alternatively obtained from the publicly available gestures in GyroPalm's Cloud Dashboard. Also, other users may be able to share gestures across the entire GyroPalm Encore ecosystem.
Each gesture takes the form of a JSON object which is stored in GyroPalm's cloud database. Gestures are usually private unless a user gives consent to share their gestures with another person. GyroPalm gestures are not compatible with non-GyroPalm branded technology. Each gesture has its own globally unique gestureID which starts with an "m" along with a series of digits.
The gestureName can be customized by the end-user as desired. Other than read-only access, developers have no control over the naming of gestureName and gestureID. The system assigns a globally unique gestureID for every newly trained gesture and the gestureName is typically renamed by the user/author after the gesture is added into the system. In the event a gesture is shared, and subsequently "cloned" into another user's account, the gestureName can be renamed by the new end-user as desired. However, that will not affect the original author's version of the gesture.
GyroPalm provides an official set of gestures that work for various use-cases. End-users may feel free to install these to their account and then sync them to their wearable. In the event a single user has more than one GyroPalm wearable added to their account, each wearable will have its own special gesture set that can be provisioned by the user.
Method Prototypes
Assuming the GyroPalmEngine object is instantiated, the developer has access to the following methods in the class:
// These methods assume that GyroPalmEngine is instantiated as 'gplm' and also GyroPalmRealtime is instantiated and connected.

void onSyncDone(int numGestures)
{
    // numGestures is the number of gestures that are available now
    // numGestures will be -1 should the wearable be offline or fail to communicate with the server
}

gplm.setSyncDoneCallback(onSyncDone);   // This is a callback that tells the wearable to run 'onSyncDone' whenever the syncGestures() command has completed fetching gestures from the server

// To retrieve the gesture names and gestureIDs of all the gestures locally on the wearable, the following function may be used:
void listAllGestures()
{
    Serial.println("Available Gestures:");
    for(int i = 0; i < gplm.totalGestures(); i++) { //iterate all gestures
        Serial.print( gplm.getGestureName(i) );
        Serial.print(" - ");
        Serial.println( gplm.getGestureID(i) );
    }
}

// To ensure reliability, always call doCalibration first. Ideally 5-10 samples is good.
void doCalibration(int samples);

// Load custom gestures set from internal memory. This is needed in the setup function.
// If loading is successful, it will return true. If no gestures found, it will return false.
bool loadGestures(void);

// Tells the wearable to start recording a new gesture and send it to the cloud
// If the training was successful, it will return "success"
// If there was a connection issue, it will return "errNoConnection"
// If the gesture storage is full, it will return "errMaxGestures"
String trainGesture(void);

// Run this function after the user performs an activation gesture
// Consider using haptic feedback and a 0.5 second delay prior to running (for best experience)
// After GyroPalm performs recognition, the onGesture callback will be run
void testGesture(void);     //tells the wearable to recognize a gesture performed

// By calling this function when GyroPalmRealtime is connected, the wearable will send a sync request to the cloud to obtain the latest gestures.
String syncGestures(void);      //fetch and update list of gestures (newly trained gestures on the wearable will be available in the user's cloud dashboard)

/*
    syncGestures() can return one of the following responses:
    "success" (successfully synchronized)
    "errServerProblem" (server intermittent issue)
    "errNoConnection" (no WiFi connection)
*/

// Deletes all the gestures from internal memory
// Understand that this action only deletes all the gestures locally on the device. Calling syncGestures() again will repopulate the gestures. To permanently delete all gestures, the end-user must do it using the GyroPalm Cloud Dashboard and then run sync again.
void formatGestures(void);
Example Code Implementation
The following is a boilerplate example of all these functions in use:
// Begin AutoGenerated Includes - DO NOT EDIT BELOW
#include <GyroPalmEngine.h>
#include <GyroPalmLVGL.h>
// End AutoGenerated Includes - DO NOT EDIT ABOVE

// Begin AutoGenerated Globals - DO NOT EDIT BELOW
GyroPalm *device;
GyroPalmEngine gplm("gp123456");    //declares a GyroPalm Engine object with wearableID
GyroPalmRealtime realtime;          //declares GyroPalm Realtime object

AXP20X_Class *power;
lv_task_t *barTask;
void lv_update_task(struct _lv_task_t *);

lv_task_t* heartbeatTask;   //for keeping alive GyroPalm Realtime connection
void lv_heartbeat_task(struct _lv_task_t *);

enum Screen { SCR_HOME, SCR_WIFICONFIG };   //Screen indexes
lv_obj_t *screen[2];    //screen pointers
GyroPalmLVGL form[2];   //screen helper methods
Screen curScreen = SCR_WIFICONFIG;    //default screen
// End AutoGenerated Globals - DO NOT EDIT ABOVE

lv_obj_t * msgboxRead;
bool detectGest = false;

// Begin AutoGenerated Callbacks - DO NOT EDIT BELOW
void lv_update_task(struct _lv_task_t *data) {
    int battPercent = power->getBattPercentage();
    bool isCharging = power->isChargeing();
    form[curScreen].updateBar(battPercent, isCharging);
    form[curScreen].setTime(gplm.getTime());     //update Time View
}

void lv_heartbeat_task(struct _lv_task_t *data) {
    realtime.heartbeat();   //keep GyroPalmRealtime connection alive
}

void showMsg(String msg) {
    msgboxRead = form[curScreen].createMsgBox((char *)msg.c_str(), PROMPT_OK, msgbox_handler, true);
}

void onPwrQuickPress()
{
    /*
    After the AXP202 interrupt is triggered, the interrupt status must be cleared,
    * otherwise the next interrupt will not be triggered
    */
    power->clearIRQ();
    // We are sleeping the device when power button pressed
    device->displaySleep();
    device->powerOff();
    esp_sleep_enable_ext1_wakeup(GPIO_SEL_35, ESP_EXT1_WAKEUP_ALL_LOW);
    esp_deep_sleep_start();
}

static void btn_event_handler(lv_obj_t * obj, lv_event_t event)
{
    if (event == LV_EVENT_CLICKED) {
        String btnName = lv_list_get_btn_text(obj);
        Serial.printf("Clicked: %s\n", btnName);

        switch (curScreen)
        {
            case SCR_HOME:
            {
                if (btnName == "Calibrate") {
                    gplm.doCalibration(6);  //do calibration by taking 6 data samples
                    showMsg("Calibration completed!");
                }
                else if (btnName == "Train") {
                    gplm.vibrateTap();
                    delay(600); //give user some time to start the gesture
                    String res = gplm.trainGesture();
                    gplm.vibrateTap();  //indicate recording finished
                    if (res == "success") {
                        showMsg("Gesture added successfully!");
                    }
                    else if (res == "errNoConnection") {
                        showMsg("Failed to sync gesture to cloud.");
                    }
                    else if (res == "errMaxGestures") {
                        showMsg("Failed. Max gestures reached!");
                    }
                }
                else if (btnName == "Test") {
                    gplm.vibrateTap();
                    delay(600); //give user some time to start the gesture
                    gplm.testGesture();
                }
                else if (btnName == "SYNC") {
                    gplm.syncGestures();
                    // Response will be processed in the backend
                }
                else if (btnName == "Format") {
                    gplm.formatGestures();
                    showMsg("Gestures Deleted!");
                }
            }
            break;

            default: break;
        }
    }
}

static void msgbox_handler(lv_obj_t *obj, String btnText)
{
    if (obj == msgboxRead) {
        Serial.println("Response from MsgBox A");
        msgboxRead = NULL;
    }
    Serial.print("User response: ");
    Serial.println(btnText);
}
// End AutoGenerated Callbacks - DO NOT EDIT ABOVE

// Begin AutoGenerated Screens - DO NOT EDIT BELOW
void showApp(int page) {
    if ((Screen) page != curScreen) {
        form[curScreen].removeBar();    //remove old StatusBar before proceeding
    }

    switch (page)
    {
        case SCR_HOME:
        {
            //Draw screen UI
            curScreen = (Screen) page;
            form[curScreen].init(screen[curScreen]);  //now defining screen items
            form[curScreen].createBar(barTask, lv_update_task);
            form[curScreen].setTime(gplm.getTime());
            form[curScreen].createLabel(0, -54, "Custom Gestures");    //show element
            form[curScreen].createButton(-77, 15, "Calibrate", btn_event_handler, true, 69);    //show element
            form[curScreen].createButton(0, 15, "Train", btn_event_handler, true, 69);    //show element
            form[curScreen].createButton(77, 15, "Test", btn_event_handler, true, 69);    //show element
            form[curScreen].createButton(-38, 84, "SYNC", btn_event_handler, true, 135);    //show element
            form[curScreen].createButton(77, 84, "Format", btn_event_handler, true, 69);    //show element

            form[curScreen].showScreen(ANIM_NONE);   //show the screen w/ no animation
        }
        break;

        case SCR_WIFICONFIG:
        {
            //Draw screen UI
            curScreen = (Screen) page;
            form[curScreen].init(screen[curScreen]);  //now defining screen items
            form[curScreen].createBar(barTask, lv_update_task);
            form[curScreen].setTime(gplm.getTime());
            form[curScreen].createLabel(0, -10, "Connecting to WiFi");    //show element

            form[curScreen].showScreen(ANIM_NONE);   //show the screen w/ no animation
        }
        break;

        default: break;
    }
}
// End AutoGenerated Screens - DO NOT EDIT ABOVE

void onGlance(bool isGlanced)
{
    if (gplm.isActive == false) {   //only takes effect if wearable not active
        if (isGlanced) {
            form[curScreen].showIcon(BAR_GLANCE);
            lv_disp_trig_activity(NULL);    //trigger user activity
        } else {
            form[curScreen].hideIcon(BAR_GLANCE);
        }
        lv_task_handler();  //update screen
    }
}

void onActivation(bool isActive)
{
    if (isActive) {
        Serial.println("Activated!");
        form[curScreen].setIconColor(BAR_GLANCE, LV_COLOR_CYAN);
        // your code here, once wearable is activated
        detectGest = true;
    } else {
        Serial.println("Deactivated!");
        form[curScreen].setIconColor(BAR_GLANCE, LV_COLOR_WHITE);
        form[curScreen].hideIcon(BAR_GLANCE);
        // your code here, once wearable is deactivated
    }
    lv_task_handler();  //update screen
}

void onGesture(String gestureName, String gestureID)
{
    Serial.print("Performed " + gestureName);
    Serial.print(" - ");
    Serial.println(gestureID);

    showMsg(gestureName);
    realtime.sendGesture(gestureName, gestureID);   //forwards this to GP Realtime

    gplm.setActive(false);
}

void onRealtimeConnection(bool isConnected)
{
    Serial.print("Connection: ");

    if (isConnected) {
        Serial.println("Connected");
        showApp(SCR_HOME);
        form[curScreen].showIcon(BAR_WIFI);
    } else {
        Serial.println("Disconnected");
        form[curScreen].hideIcon(BAR_WIFI);
    }

    lv_task_handler();
}

void onRealtimeIncoming(String msg)
{
    if (msg.indexOf("loadGestures") > -1) {
        gplm.loadGestures();
        Serial.println(gplm.gesturesJSON);
    }
    else if (msg.indexOf("listGestures") > -1) {
        listGestures();
    }
    else {
        Serial.print("Incoming: ");
        Serial.println(msg);
    }
}

void onRealtimeREST(String url, String response)
{
    Serial.println("URL:");
    Serial.println(url);
    Serial.println("Response:");
    Serial.println(response);
}

void listGestures()
{
    Serial.println("Available Gestures:");
    for(int i = 0; i < gplm.totalGestures(); i++) {
        Serial.print(gplm.getGestureName(i));
        Serial.print(" - ");
        Serial.println(gplm.getGestureID(i));
    }
}

void onSyncDone(int numGestures)
{
    String msg;
    if (numGestures == -1) {
        msg = "Sync failed. Reboot and try again";
    } else {
        msg = "Successfully synced " + String(numGestures) + " gestures";
    }
    gplm.vibratePress();
    showMsg(msg);
    listGestures();
}

void setup() {

    // Begin AutoGenerated Setup - DO NOT EDIT BELOW
    gplm.begin();
    delay(100);

    gplm.listenEvents(false);    //starts listening for events

    gplm.autoTimeout = false;    //tells the wearable to deactivate automatically
    gplm.deactivateTimeout = 3000;  // (optional) timeout in miliseconds (3 seconds default)
    gplm.activationGesture = ACT_DOUBLE_SNAP;   // (optional) ACT_DOUBLE_SNAP by default
    gplm.setActivationCallback(onActivation);   // register activation gesture callback

    gplm.setPwrQuickPressCallback(onPwrQuickPress);
    gplm.setGlanceCallback(onGlance);
    gplm.setGestureCallback(onGesture);
    gplm.setSyncDoneCallback(onSyncDone);

    device = gplm.wearable; //gives control to the developer to run device methods
    device->lvgl_begin();   //Initiate LVGL core
    device->bl->adjust(120);    //Lower the brightness
    power = gplm.power;     //gives control to the developer to access power methods
    power->setChargeControlCur(380);    //enable fast charging

    showApp(curScreen);
    // End AutoGenerated Setup - DO NOT EDIT ABOVE

    lv_task_handler();

    gplm.doCalibration(6);  //do 0.6 second calibration

    // Attach Realtime callbacks
    realtime.setConnectionCallback(onRealtimeConnection);
    realtime.setIncomingCallback(onRealtimeIncoming);
    realtime.setRestCallback(onRealtimeREST);
    realtime.setGyroPalmEngine(&gplm);

    realtime.connectWiFi();             //Establish connection with saved WiFi, or opens captive portal
    realtime.verboseFlag = false;       //Set to true if you want to see Realtime debug
    realtime.connect(gplm.myLicense);   //securely connect to GyroPalm Realtime

    gplm.loadGestures();
    heartbeatTask = lv_task_create(lv_heartbeat_task, 50000, LV_TASK_PRIO_LOWEST, NULL); //run task every 50 seconds
}

void loop() {
    if (detectGest) {
        detectGest = false;
        delay(600);
        gplm.testGesture();
    }

    realtime.loop();    //need this for GyroPalm Realtime to operate
    // Begin AutoGenerated Loop - DO NOT EDIT BELOW
    lv_task_handler();
    delay(30);
    // End AutoGenerated Loop - DO NOT EDIT ABOVE
}
OTA Firmware Updates
Typically, firmware updates can be performed over USB via GyroPalm Jumpstarter. However, GyroPalm Encore also supports over-the-air (OTA) firmware updates. The firmware of the wearable can be updated within minutes as long as the wearable has a preconfigured WiFi connection and access to the WiFi network. The OTA functionality is an experimental feature and may not be suitable for all applications.
Method Prototype
The following method is part of the GyroPalmCloud object:
void runOTA(String wearableID, String secret);
Object Declarations
The following object instantiations are assumed:
GyroPalm *device;
GyroPalmEngine gplm("gp123456");    //declares a GyroPalm Engine object with wearableID
GyroPalmCloud * gpcloud;
Connecting to WiFi
Prior to requesting for OTA, the device must be first connected to a WiFi network. The following code may be put in the void setup() or function that runs once:
gpcloud->getInstance();
gpcloud->connectWiFi();
Run OTA
By calling the runOTA method, the wearable contacts GyroPalm's secure API to fetch the latest firmware for the current wearable. Should the OTA fail to update the firmware, the error message will be shown via the Serial Monitor.
gpcloud->runOTA(gplm.myLicense.wearableID, gplm.myLicense.secret);
Warnings
OTA is not advised if your firmware is extremely large or requires the GyroPalmRealtime object. When using GyroPalmRealtime, the wearable may be unable to consistently perform OTA as a result of memory limitations. OTA is only recommended as an experimental feature.
Setting the OTA Firmware
GyroPalm Developers will be able to assign firmware to their wearables in GyroPalm Studio via the Settings tab. The API for this functionality is under development. Please contact support for details.
GyroPalm Realtime object
What is the GyroPalmRealtime object?
The GyroPalmRealtime object is a high-performance enhanced secure websocket client (WSS) that enables the GyroPalm Encore to communicate directly to GyroPalm's Realtime server without any additional headers or libraries. With the included native methods, developers can instantiate the GyroPalmRealtime object to control and monitor GyroPalm-compatible devices anywhere in the world. By including GyroPalmEngine.h into your main code, the GyroPalmRealtime object and its methods are made available. Bi-directional messages can be sent as strings or in JSON format.
What is the GyroPalmRealtime server?
The GyroPalmRealtime server is a low-latency secured websocket server (WSS) on GyroPalm's core architecture. Its services are available to all users of GyroPalm on a 24/7 basis, and can be used to globally connect thousands of devices without the need for any port-forwarding, NAT tunneling, or VPN routing.
The GyroPalmRealtime server features better performance than SocketIO, MQTT, and some other protocols. This server does not have a payload limit, but it requires authentication for all users before communication is processed. It contains built-in mechanisms to prevent unauthorized access and user spoofing.
Developers can send and receive real-time data to and from GyroPalm devices using the GyroPalmRealtime server. GyroPalm also provides software development kits (SDK) for connecting to GyroPalmRealtime through a Javascript or .NET environment. Learn more by vising the GyroPalm SDK Docs.
Advantages of GyroPalmRealtime
-
By using
GyroPalmRealtimeobject, you can communicate with your computer, robot, appliance, or other device using high speed websockets, without the need to implement your own websocket or MQTT server or library. -
Using the
GyroPalmRealtimenetwork will allow your firmware to be easily compatible with the entire ecosystem of GyroPalm devices. Anyone with a GyroPalm wearable will be able to communicate with your code, once the end-user provides consent. -
Run almost any REST API with ease through
GyroPalmRealtime. Or use GyroPalm as a webhook. -
GyroPalm provides a smartphone app for Android and iOS for a "wireless serial monitor". You can also use
GyroPalm Jumpstarteron your PC as a "wireless serial monitor". By sending your serial messages throughGyroPalmRealtimeinstead of via USB, it can be helpful for testing new gestures without having your wearable be physically tied to the computer via the USB cable. -
No more needing to use Ngrok or port forwarding for IoT purposes.
-
Access to
GyroPalmRealtimeis free for all GyroPalm users and customers.
Users and usage is subject to GyroPalm's Terms and Conditions. GyroPalm reserves the right to revoke user privileges due to misuse, violation of Terms, or other security concerns.
Initiating the GyroPalmRealtime object
To use the GyroPalmRealtime object, the GyroPalmEngine object must first be instantiated. The instantiation of GyroPalmEngine is needed as it contains the wearable's unique ID and secret which are required for securely authenticating with the GyroPalm Realtime server. The GyroPalmRealtime object can be instantiated as follows:
#include <GyroPalmEngine.h>

GyroPalm *device;                   //declares a null device
GyroPalmEngine gplm("");            //declares a GyroPalm Engine object
GyroPalmRealtime realtime;          //declares GyroPalm Realtime object
Required Methods
In order for the realtime object to function properly, include the following inside your void loop() function:
realtime.loop(); //need this for GyroPalm Realtime to operate
Ensure that this line of code is run every 100ms or less for best performance.
Connecting to the Internet
Prior to using the realtime object, you must connect the wearable to an internet-enabled WiFi network by declaring this in your void setup() function:
    realtime.connectWiFi();             //Establish connection with saved WiFi, or opens captive portal
    realtime.verboseFlag = false;       //Set to true if you want to see Realtime debug
By running the code above, the wearable will attempt to connect to the last saved WiFi network. If the wearable does not have a saved WiFi network, it will broadcast its own ad-hoc WiFi network called GyroPalm Encore. Please instruct the end-user to perform the following steps:
- Open the WiFi Settings on your phone or laptop.
- Find the network called
GyroPalm Encoreand connect to it using password 12345678. There will be no internet. - Open a web browser on the phone or laptop and go to
192.168.4.1 - Click the Configure WiFi button. Select your home or office WiFi network.
- Type in your WiFi password, if any. Click Save.
The user can now close the browser and restore the previous WiFi network connection.
Note: The GyroPalm Encore does not support 5GHz WiFi bands, public WiFi (i.e. Starbucks), or enterprise authentication networks (i.e. PEAP, Eduroam, etc) which require more than a password to sign in. Please use a mobile hotspot or find a WiFi network with supported security protocol such as WEP, WPA2, WPA-PSK, etc. Port 3200 must not be blocked.
Realtime Callbacks
At the time of writing, the GyroPalmRealtime object has 3 callback events. The events make it easy for you to manage the wearable experience without constantly polling certain functions in your loop.
A callback function or method is a funcion that you, the developer, normally define. To write the function, you would have to know the function prototype, write the function as needed, and then register the relevant callback function(s).
Event Function Prototypes
Feel free to change the function name and the input variable name, but do not change the function return type or input type. There will be a completed example callback code provided at the end for your convenience.
void onRealtimeConnection(bool isConnected)
This function gets run with isConnected being a Boolean which is true if the event indicates a connection established and false if the connection was closed.
void onRealtimeIncoming(String msg)
This function gets run with msg containing the string (or JSON) that was was sent to the wearable via GyroPalmRealtime server. For example, if the msg string is in JSON with two keys called action and command, you may parse this by using the following example code:
void onRealtimeIncoming(String msg)
{
    Serial.print("Incoming: ");
    Serial.println(msg);

    const size_t capacity = JSON_OBJECT_SIZE(2) + 60;
    DynamicJsonBuffer jsonBuffer(capacity);
    JsonObject& root = jsonBuffer.parseObject(msg);

    String action = root["action"];
    String command = root["command"];

    Serial.println(action);
    Serial.println(command);
}
Note that you do not need any additional libraries to parse JSON as this functionality is native and available through GyroPalmEngine.
void onRealtimeREST(String url, String response)
This function gets run after you send a REST API request using GyroPalmRealtime. The url string contains the URL which initially started the request. The response string contains the JSON or HTML body response returned from the Realtime server. Here is an example of a callback that simply prints out a REST API response:
void onRealtimeREST(String url, String response)
{
    Serial.println("URL:");
    Serial.println(url);
    Serial.println("Response:");
    Serial.println(response);
}
It is important to note that the GyroPalm Wearable has limited memory when it comes to processing long JSON responses. Please be mindful that while most responses which are less than 2048 bytes generally perform well, exceeding this may cause undesirable results.
Registering Callback Functions
In order to use the callback functions mentioned above, the callbacks need to be registered in your void setup() function. Register the functions as needed:
realtime.setConnectionCallback(onRealtimeConnection);
realtime.setIncomingCallback(onRealtimeIncoming);
realtime.setRestCallback(onRealtimeREST);
realtime.setGyroPalmEngine(&gplm);  //attaches GyroPalmEngine instance for core functions (i.e. vibration, setTime, etc)
GyroPalm Realtime Functions
In addition to the event-based callbacks, developers can use methods provided the GyroPalmRealtime object to connect, disconnect, and send messages to GyroPalm's Realtime server.
Connect to Realtime
Connect to the GyroPalm Realtime server. Developers may choose to run this on a button press event, or simply before the end of the void setup() function:
realtime.connect(gplm.myLicense); //securely connect to GyroPalm Realtime
This method only works after the WiFi is connected.
Disconnect from Realtime
To disconnect from the GyroPalm Realtime server, this method may be used. In some cases, the wearable may attempt to reconnect if a message transmission was in progress.
realtime.disconnect(); //disconnects from server
Send Serial via Realtime
This method sends a string to the GyroPalm Realtime server. The payload actually sent comprises a JSON object with the action key being pub, wearableID reflecting the current wearable's unique ID, and the string being the value of sensorVal.
realtime.sendSerial("Hello World"); //send Realtime String
The string "Hello World" can be replaced with another string or JSON payload of your choice. Remember to cast integers, Booleans, and other data types into JSON as needed. For assistance with JSON serializing, you may use the ArduinoJSON v5 Assistant.
Alternatively, if you are trying to send a REST API request, you may use:
realtime.sendREST(requestString);
Refer to section below called Send REST API in Realtime.
Send Heartbeat to Realtime
Unless the GyroPalm wearable is broadcasting Realtime messages every few seconds, there may be times when there is an idle connection. To keep operational efficiency, the GyroPalm Realtime server will disconnect clients that are inactive or offline for more than a minute.
Update: This method is now obsolete and will be phased out. It is no longer necessary to call the heartbeat() method since it is already being run automatically every 50 seconds by just calling the realtime.loop() method.
To keep a device connected, it must broadcast a heartbeat every minute or less to the GyroPalm Realtime server as follows:
realtime.heartbeat(); //send this every 30-50 seconds to prevent timeout
If you are including and using GyroPalmLVGL in the firmware, you may create an LVGL task that runs the above method every 50 seconds by adding the following into your code:
//Insert this into your globals:
lv_task_t* heartbeatTask;
void lv_heartbeat_task(struct _lv_task_t *);


//Insert this before:
void lv_heartbeat_task(struct _lv_task_t *data) {
    realtime.heartbeat();   //keep GyroPalmRealtime connection alive
}


//Insert this before the end of void setup()
heartbeatTask = lv_task_create(lv_heartbeat_task, 50000, LV_TASK_PRIO_LOWEST, NULL); //run task every 50 seconds
Prior to disconnecting GyroPalmRealtime, you can stop the heartbeatTask as follows:
lv_task_del(heartbeatTask); //removes the task from running
Get Connection Status
At any time, you can retrieve a Boolean that indicates whether the wearable is connected to the GyroPalm Realtime server using the following:
bool isRealtimeConnected = realtime->isConnected; //true if connected
Send REST API in Realtime
The GyroPalm Encore can perform REST API calls using the GyroPalm Realtime server as a relay. This allows for faster speeds rather than opening a new connection since the wearable sustains an open connection with the server during Realtime. To use this feature, send a JSON string containing a key called action with value as api. Only wearables may perform this function.
The following example code will send a POST request containing www-form-urlencoded data:
const size_t capacity = 2*JSON_OBJECT_SIZE(2) + JSON_OBJECT_SIZE(5);
DynamicJsonBuffer jsonBuffer(capacity);

JsonObject& root = jsonBuffer.createObject();
root["action"] = "api";
root["method"] = "POST";
root["url"] = "https://webhook.site/2e15a6a5-91e7";

JsonObject& headers = root.createNestedObject("headers");
headers["Wearable-Id"] = "gp123456";    //optional in some cases
headers["Content-Type"] = "application/x-www-form-urlencoded";

JsonObject& form = root.createNestedObject("form");
form["apiKey"] = "abc123";
form["paramName"] = "paramValue";

String packet = "";
root.printTo(packet);
realtime.sendREST(packet);
The following example code will send a POST request containing a JSON body:
const size_t capacity = JSON_OBJECT_SIZE(2) + 2*JSON_OBJECT_SIZE(5);
DynamicJsonBuffer jsonBuffer(capacity);

JsonObject& root = jsonBuffer.createObject();
root["action"] = "api";
root["method"] = "POST";
root["url"] = "https://webhook.site/2e15a6a5-91e7";

JsonObject& headers = root.createNestedObject("headers");
headers["Authorization"] = "Basic YzhjYTdmY2RjY2UyN=";  //optional in some cases
headers["Content-Type"] = "application/json";

const size_t capacity2 = JSON_OBJECT_SIZE(5);    //adjust according to your JSON body
DynamicJsonBuffer jsonBodyBuffer(capacity2);
JsonObject& body = jsonBodyBuffer.createObject();

//Define your body JSON keys and values, as needed
body["fullname"] = "John Smith";
body["email"] = "jsmith@example.com";

String bodyStr = "";
body.printTo(bodyStr);
root["body"] = bodyStr; //Append JSON body to the request

String packet = "";
root.printTo(packet);
realtime.sendREST(packet);
GyroPalmRealtime Example Code
To demonstrate the usage of the GyroPalmRealtime methods and events, here is some fully working example code that you can paste into GyroPalm Studio to evaluate:
// Begin AutoGenerated Includes - DO NOT EDIT BELOW
#include <GyroPalmEngine.h>
#include <GyroPalmLVGL.h>
// End AutoGenerated Includes - DO NOT EDIT ABOVE

// Begin AutoGenerated Globals - DO NOT EDIT BELOW
GyroPalm *device;
GyroPalmEngine gplm("gp123456");    //declares a GyroPalm Engine object with wearableID
GyroPalmRealtime realtime;          //declares GyroPalm Realtime object

AXP20X_Class *power;
lv_task_t *barTask;
void lv_update_task(struct _lv_task_t *);

enum Screen { SCR_HOME };   //Screen indexes
lv_obj_t *screen[1];    //screen pointers
GyroPalmLVGL form[1];   //screen helper methods
Screen curScreen = SCR_HOME;    //default screen
// End AutoGenerated Globals - DO NOT EDIT ABOVE

lv_task_t* heartbeatTask;
void lv_heartbeat_task(struct _lv_task_t *);

lv_obj_t * msgboxRead;
lv_obj_t * btnConnect;

// Begin AutoGenerated Callbacks - DO NOT EDIT BELOW
void lv_update_task(struct _lv_task_t *data) {
    int battPercent = power->getBattPercentage();
    bool isCharging = power->isChargeing();
    form[curScreen].updateBar(battPercent, isCharging);
    form[curScreen].setTime(gplm.getTime());     //update Time View
}

static void btn_event_handler(lv_obj_t * obj, lv_event_t event)
{
    if (event == LV_EVENT_CLICKED) {
        String btnName = lv_list_get_btn_text(obj);
        Serial.printf("Clicked: %s\n", btnName);

        switch (curScreen)
        {
            case SCR_HOME:
                if (btnName == "Connect") {
                    realtime.connect(gplm.myLicense);   //securely connect to GyroPalm Realtime

                    lv_obj_t * label = lv_obj_get_child(obj, NULL); // get button text
                    lv_label_set_text(label, "Disconnect"); // change button text
                }
                if (btnName == "Disconnect") {
                    realtime.disconnect();

                    lv_obj_t * label = lv_obj_get_child(obj, NULL); // get button text
                    lv_label_set_text(label, "Connect"); // change button text
                }
                if (btnName == "Test A") {
                    realtime.sendSerial("Test A");      //send Realtime String
                }
                if (btnName == "API 1") {
                    const size_t capacity = 2*JSON_OBJECT_SIZE(2) + JSON_OBJECT_SIZE(5);
                    DynamicJsonBuffer jsonBuffer(capacity);

                    JsonObject& root = jsonBuffer.createObject();
                    root["action"] = "api";
                    root["method"] = "POST";
                    root["url"] = "https://webhook.site/774e1f20-a19e-47da-87ba-8a5a817fefdf";

                    JsonObject& headers = root.createNestedObject("headers");
                    headers["Wearable-Id"] = "gp123456";    //optional in some cases
                    headers["Content-Type"] = "application/x-www-form-urlencoded";

                    JsonObject& form = root.createNestedObject("form");
                    form["apiKey"] = "abc123";
                    form["paramName"] = "paramValue";

                    String packet = "";
                    root.printTo(packet);
                    realtime.sendREST(packet);
                }
                if (btnName == "API 2") {
                    const size_t capacity = JSON_OBJECT_SIZE(2) + 2*JSON_OBJECT_SIZE(5);
                    DynamicJsonBuffer jsonBuffer(capacity);

                    JsonObject& root = jsonBuffer.createObject();
                    root["action"] = "api";
                    root["method"] = "POST";
                    root["url"] = "https://webhook.site/774e1f20-a19e-47da-87ba-8a5a817fefdf";

                    JsonObject& headers = root.createNestedObject("headers");
                    headers["Authorization"] = "Basic YzhjYTdmY2RjY2UyN=";  //optional in some cases
                    headers["Content-Type"] = "application/json";

                    const size_t capacity2 = JSON_OBJECT_SIZE(5);    //adjust according to your JSON body
                    DynamicJsonBuffer jsonBodyBuffer(capacity2);
                    JsonObject& body = jsonBodyBuffer.createObject();

                    //Define your body JSON keys and values, as needed
                    body["fullname"] = "John Smith";
                    body["email"] = "jsmith@example.com";

                    String bodyStr = "";
                    body.printTo(bodyStr);
                    root["body"] = bodyStr;

                    String packet = "";
                    root.printTo(packet);
                    realtime.sendREST(packet);
                }
            break;

            default: break;
        }
    }
}

// End AutoGenerated Callbacks - DO NOT EDIT ABOVE

void showMsg(String msg) {
    msgboxRead = form[curScreen].createMsgBox((char *)msg.c_str(), PROMPT_OK, msgbox_handler, true);
}

static void msgbox_handler(lv_obj_t *obj, String btnText)
{
    if (obj == msgboxRead) {
        Serial.println("Response from MsgBox A");
        msgboxRead = NULL;
    }
    Serial.print("User response: ");
    Serial.println(btnText);
}

// Begin AutoGenerated Screens - DO NOT EDIT BELOW
void showApp(int page) {
    if ((Screen) page != curScreen) {
        form[curScreen].removeBar();    //remove old StatusBar before proceeding
    }

    switch (page)
    {
        case SCR_HOME:
        {
            //Draw screen UI
            curScreen = (Screen) page;
            form[curScreen].init(screen[curScreen]);  //now defining screen items
            form[curScreen].createBar(barTask, lv_update_task);
            form[curScreen].setTime(gplm.getTime());
            form[curScreen].createLabel(0, -54, "Realtime Test");    //show element
            btnConnect = form[curScreen].createButton(0, 15, "Connect", btn_event_handler, true, 200);    //show element
            form[curScreen].createButton(-77, 84, "Test A", btn_event_handler, true, 65);    //show element
            form[curScreen].createButton(0, 84, "API 1", btn_event_handler, true, 65);    //show element
            form[curScreen].createButton(77, 84, "API 2", btn_event_handler, true, 65);    //show element

            form[curScreen].showScreen(ANIM_NONE);   //show the screen w/ no animation
        }
        break;


        default: break;
    }
}
// End AutoGenerated Screens - DO NOT EDIT ABOVE

void onRealtimeConnection(bool isConnected)
{
    Serial.print("Connection: ");

    lv_obj_t * label = lv_obj_get_child(btnConnect, NULL); // get button text

    if (isConnected) {
        Serial.println("Connected");
        lv_label_set_text(label, "Disconnect"); // change button text
    } else {
        Serial.println("Disconnected");
        lv_label_set_text(label, "Connect"); // change button text
    }
}

void onRealtimeIncoming(String msg)
{
    Serial.print("Incoming: ");
    Serial.println(msg);

    const size_t capacity = JSON_OBJECT_SIZE(2) + 60;
    DynamicJsonBuffer jsonBuffer(capacity);
    JsonObject& root = jsonBuffer.parseObject(msg);

    String action = root["action"];
    String command = root["command"];

    if (action.indexOf("data") > -1) {
        if (command.indexOf("vibrateTap") > -1) {
            gplm.vibrateTap();
        }
        else if (command.indexOf("vibratePress") > -1) {
            gplm.vibratePress();
        }
        else if (command.indexOf("vibrateHold") > -1) {
            gplm.vibrateHold();
        }
        else if (command.indexOf("msg") > -1) {
            showMsg(String(command));
        }
    }
}

void onRealtimeREST(String response)
{
    const size_t capacity = JSON_OBJECT_SIZE(4) + 2780; //expand this as needed
    DynamicJsonBuffer jsonBuffer(capacity);
    JsonObject& root = jsonBuffer.parseObject(response);

    const char* action = root["action"]; // Always "info"
    const char* stat = root["stat"]; // Always "output"
    String url = root["url"]; // URL which you can use to check
    String msg = root["msg"]; // Body response

    Serial.println(url);
    Serial.println("Response:");
    Serial.println(msg);
}

void lv_heartbeat_task(struct _lv_task_t *data) {
    realtime.heartbeat();   //keep GyroPalmRealtime connection alive
}

void setup() {

    // Begin AutoGenerated Setup - DO NOT EDIT BELOW
    gplm.begin();
    delay(100);
    gplm.listenEvents(false);    //starts listening for events


    device = gplm.wearable; //gives control to the developer to run device methods
    device->lvgl_begin();   //Initiate LVGL core
    device->bl->adjust(120);    //Lower the brightness
    power = gplm.power;     //gives control to the developer to access power methods
    power->setChargeControlCur(380);    //enable fast charging

    showApp(curScreen);
    // End AutoGenerated Setup - DO NOT EDIT ABOVE

    realtime.connectWiFi();             //Establish connection with saved WiFi, or opens captive portal
    realtime.verboseFlag = false;       //Set to true if you want to see Realtime debug

    // Attach Realtime callbacks
    realtime.setConnectionCallback(onRealtimeConnection);
    realtime.setIncomingCallback(onRealtimeIncoming);
    realtime.setRestCallback(onRealtimeREST);
    realtime.setGyroPalmEngine(&gplm);

    heartbeatTask = lv_task_create(lv_heartbeat_task, 50000, LV_TASK_PRIO_LOWEST, NULL); //run task every 50 seconds
}

void loop() {
    realtime.loop();    //need this for GyroPalm Realtime to operate

    // Begin AutoGenerated Loop - DO NOT EDIT BELOW
    lv_task_handler();
    delay(50);
    // End AutoGenerated Loop - DO NOT EDIT ABOVE
}
GyroPalm Settings
What is the GyroPalmSettings object?
When coding a wearable project (or app) with the GyroPalmEngine object, there may be times when the developer wishes to store data into a wearable's internal memory for retrieval at a later time. By default, code written in GyroPalm Studio is stateless. That means any global variables that are altered by the end-user during runtime will not be saved once the device is powered off. Global variables revert to their originally declared values whenever the GyroPalm wearable device is power cycled.
Developers with apps that require users to enter a zip code, API key, or other wearable-specific information, will need to store such information in the GyroPalm Encore's internal memory. Typically, this is achieved through SPIFFS. The GyroPalmSettings object makes it very easy for developers to store and retrieve one of more variables that are specific to their app. It is so easy to use, that storing and retrieving a parameter only takes 3 lines of code!
Advantages of GyroPalmSettings
- By using
GyroPalmSettings, you can store data types such asbool,String,int,float, andlong. - By using
GyroPalmSettings, the GyroPalm Encore wearable can restore the end-user's settings whenever the device is power cycled or after your app is closed. - By using
GyroPalmSettings, you can potentially export and import the settings as JSON to another wearable using theGyroPalmRealtimeobject. - No more needing to hard-code parameters. Users can personalize as much as they want.
- Settings stored with
GyroPalmSettingswill not have conflicts with other GyroPalm app, even if the keys are the same. They are unique to yourappID.
Initiating the GyroPalmSettings object
To use the GyroPalmSettings object, the GyroPalmEngine object must first be instantiated. It is important to declare #include <GyroPalmEngine.h> in your code since GyroPalmSettings is a subset of the GyroPalmEngine. The GyroPalmSettings object can be instantiated as follows:
#include <GyroPalmEngine.h>

GyroPalm *device;                   //declares a null device
GyroPalmEngine gplm("");            //declares a GyroPalm Engine object
GyroPalmSettings settings;          //declares GyroPalm Settings object
Required Methods
In order for the settings object to initiate properly, include the following before the end of your void setup() function:
settings.load("yourAppID");
Please replace "yourAppID" with your actual appID. To retrieve your appID, open your project (or app) in GyroPalm Studio and copy the text at the end of the URL. The appID should typically be a set of 10 alphanumeric characters. For example, if your editor URL is https://app.gyropalm.com/studio/editor/123cb28ftd, your appID would be 123cb28ftd. This ID is unique to every app created across GyroPalm Studio.
This method will retrieve the respective settings file from SPIFFS memory and prepare your settings for storage and/or retrieval. If loaded, the method returns true. The function prototype for this is as follows:
Function Prototype
bool load(String appID);
Create or Update Settings
After running the required method to load, you may add or update a setting by using the following methods:
Function Prototypes
void setBool(String keyName, bool value);
void setString(String keyName, String value);
void setInt(String keyName, int value);
void setFloat(String keyName, float value);
void setLong(String keyName, long value);
After using any of the above methods, you must commit the setting(s) into flash memory. Use the following to save all your declared parameters into memory:
bool save(void);
Example Usage
Assuming GyroPalmSettings is instantiated as settings, you may set various data types. Ensure that you use the appropriate method that matches your data type.
// Declare test variables
bool testBoolean = true;
String testString = "Hello World";
int testInteger = 250;
float testFloat = 3.1415;
long testLong = 1234567;

// Prepare to save variables
settings.setBool("testBoolean", testBoolean);
settings.setString("testString", testString);
settings.setInt("testInteger", testInteger);
settings.setFloat("testFloat", testFloat);
settings.setLong("testLong", testLong);

settings.save();    // Save all settings
Retrieve Settings
After running the required method to load, you may retrieve a setting by using the following methods:
Function Prototypes
bool getBool(String keyName);
String getString(String keyName);
int getInt(String keyName);
float getFloat(String keyName);
long getLong(String keyName);
Example Usage
Assuming GyroPalmSettings is instantiated as settings, you may get various data types. Ensure that you use the appropriate method that matches your data type.
// Retrieve test variables
bool testBoolean = settings.getBool("testBoolean"); // true
String testString = settings.getString("testString");   // "Hello World"
int testInteger = settings.getInt("testInteger");   // 250
float testFloat = settings.getFloat("testFloat");   // 3.1415
long testLong = settings.getLong("testLong");   // 1234567

// Print out the results
Serial.print("testBoolean: ");
Serial.println(testBoolean);

Serial.print("testString: ");
Serial.println(testString);

Serial.print("testInteger: ");
Serial.println(testInteger);

Serial.print("testFloat: ");
Serial.println(testFloat);

Serial.print("testLong: ");
Serial.println(testLong);
Print Settings
Sometimes, developers may want to debug settings in the Serial Monitor. Settings are originally stored in JSON format where both the keys and values are visible. To print out this JSON in the Serial Monitor, the following method can be used:
settings.print();
Function Prototype
void print(void);
For users who want to retrieve or set the JSON string, the following can be used:
Serial.println(settings.settingsJSON);
Clear Buffer
After retrieving settings, it is a good practice to clear the buffer to optimize memory. Should you need to read/write settings again, simply called the settings.load("appID") method again. To clear the JSON buffer, this method can be used:
settings.clearBuffer();
Function Prototype
void clearBuffer(void);
Delete All Settings
Once settings of an app are deleted, the data cannot be recovered. This method will delete all the settings of the current app from the appID provided when you loaded them:
settings.deleteAll();
Function Prototype
bool deleteAll(void);
For data loss prevention, there is no method that will delete all the settings of all apps on a wearable. The settings keys and values are isolated for each app to prevent other apps from being affected.